In the digital era, the smart home ecosystem is rapidly expanding, encompassing not just traditional devices like lights, media players, and PCs, but also integrating software applications on your home server. Transmission, a renowned lightweight and open-source BitTorrent client, stands out for its ease of use and efficiency in handling file downloads. In this guide, we'll walk you through the process of controlling your Transmission activities directly from the Home Assistant Dashboard, leveraging automation for a seamless experience, especially in optimizing network usage based on the presence of people in the home.
Contents
- Ethical Considerations and the Stance of Home Assistant Guide
- The Role of Transmission in a Smart Home Setup
- Setting the Stage for Integration
- How to Integrate Transmission with Home Assistant
- Creating the Transmission turtle mode automation in Home Assistant
- Creating the Transmission Turtle Mode Automation in Node-RED
- Further Ideas for Transmission Automations in Home Assistant
- Transmission Sensors and Switches in the Home Assistant Dashboard
Ethical Considerations and the Stance of Home Assistant Guide
First and foremost, it's crucial to address the ethical landscape surrounding torrenting. Home Assistant Guide firmly stands against piracy in all its forms, emphasizing that the instructions provided are for educational purposes only. Respecting intellectual property rights and supporting content creators through legal channels is paramount to foster a healthy digital ecosystem.
The Role of Transmission in a Smart Home Setup
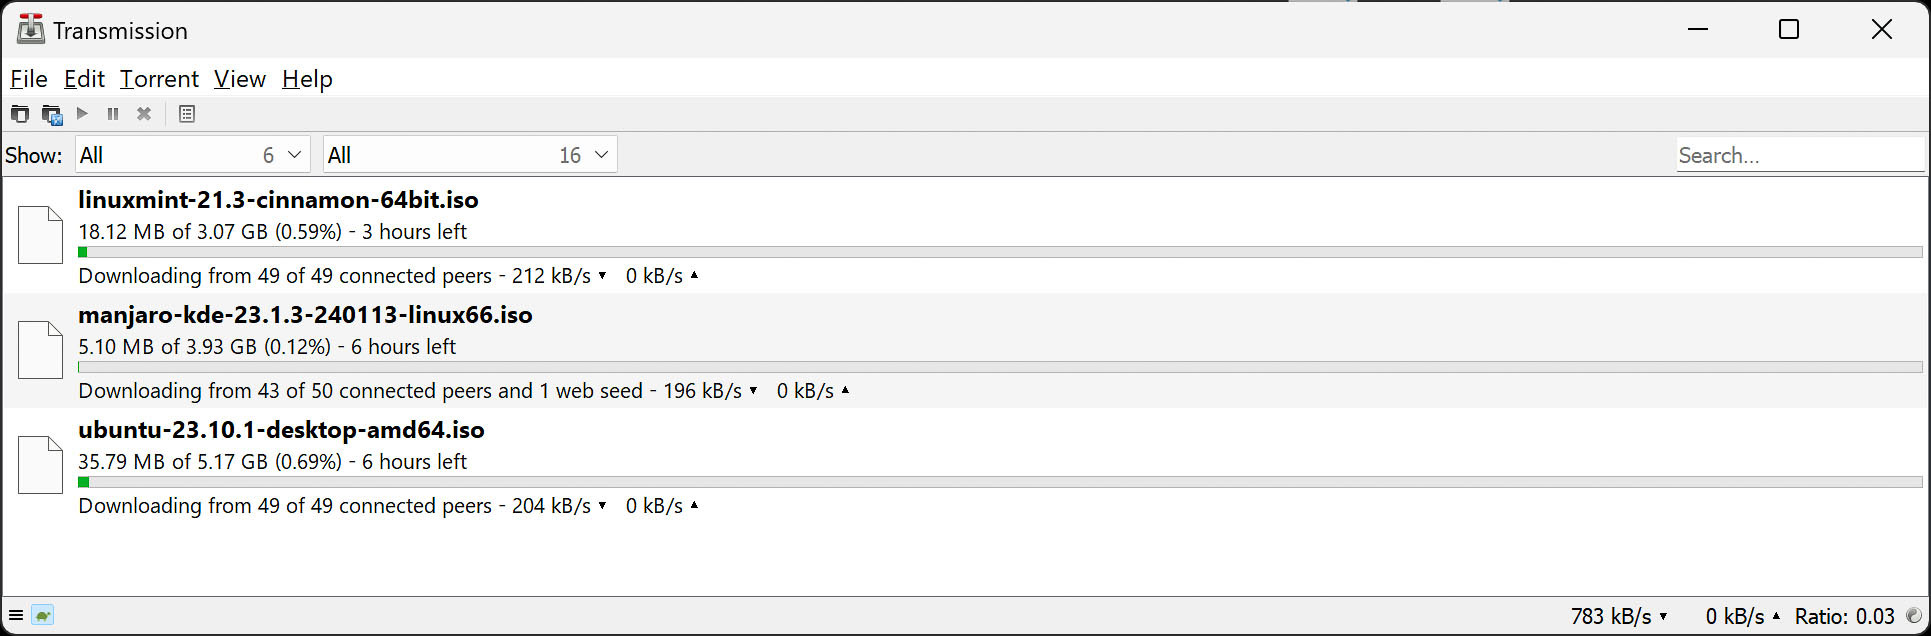
Transmission's appeal lies in its minimalistic interface, low resource consumption, and versatility across different operating systems. My setup involves running Transmission within a Docker container, sharing the same host as my Home Assistant Core container. The challenge, however, lies in managing Transmission's network consumption to prevent it from hindering other online activities within the home. This is where the clever use of Home Assistant's automation capabilities comes into play.
Setting the Stage for Integration
Integrating Transmission with Home Assistant is straightforward and doesn't discriminate based on your Home Assistant installation type. Essential prerequisites include a functional Transmission setup with access from within the home network enabled.
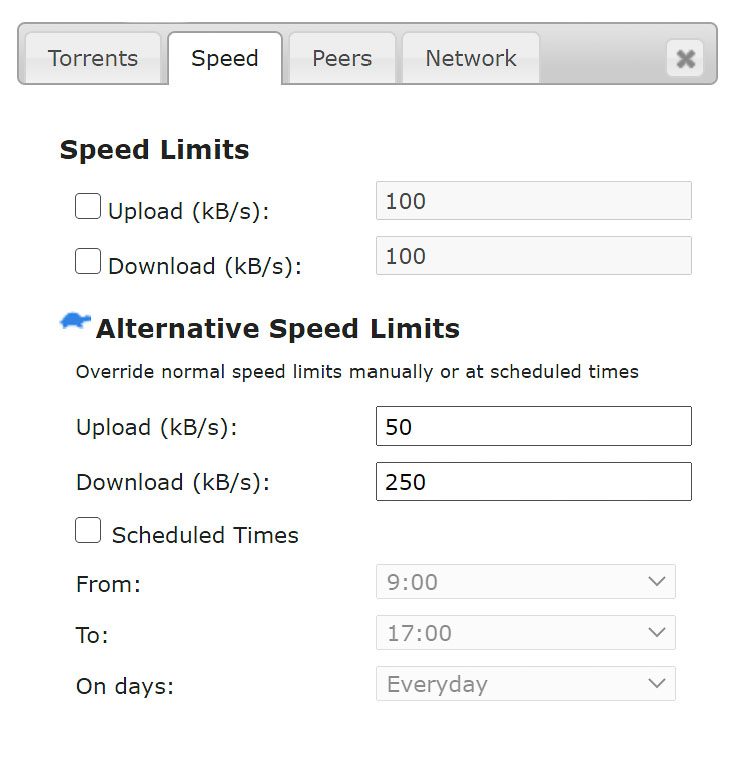
To let Home Assistant boost your home network's performance, set up the alternate speeds (often referred to as “turtle mode” because of its turtle-shaped icon) in your Transmission client. The speeds should be low enough to keep Transmission's presence unnoticed when doing other work on your home network.
How to Integrate Transmission with Home Assistant
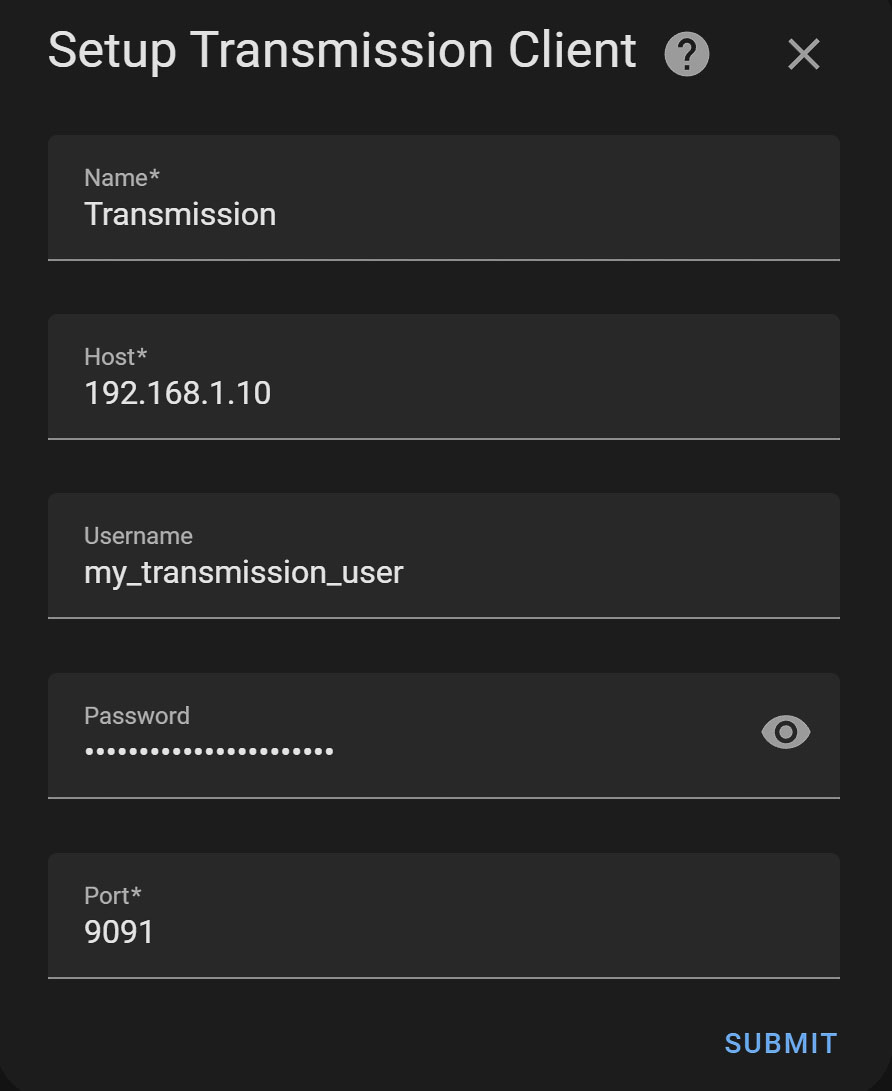
To achieve integration, you'll need the host IP, Transmission's port (default 9091), and your user credentials. Home Assistant's graphical interface facilitates a hassle-free setup process, granting immediate access to valuable sensors and switches for managing your torrent activities.
Key Integration Features
- Sensors provide insights into Transmission daemon's status, including current download/upload speeds and torrent counts.
- Switches offer functionality to start/stop all torrents and toggle turtle mode, crucial for managing bandwidth.
- Events and Services enable advanced automations, such as personalized notifications and direct torrent management from the dashboard.
Services Provided by the Integration
The Transmission integration with Home Assistant includes services for adding, removing, starting, and stopping torrents directly from the dashboard, enhancing the automation capabilities for your torrenting experience.
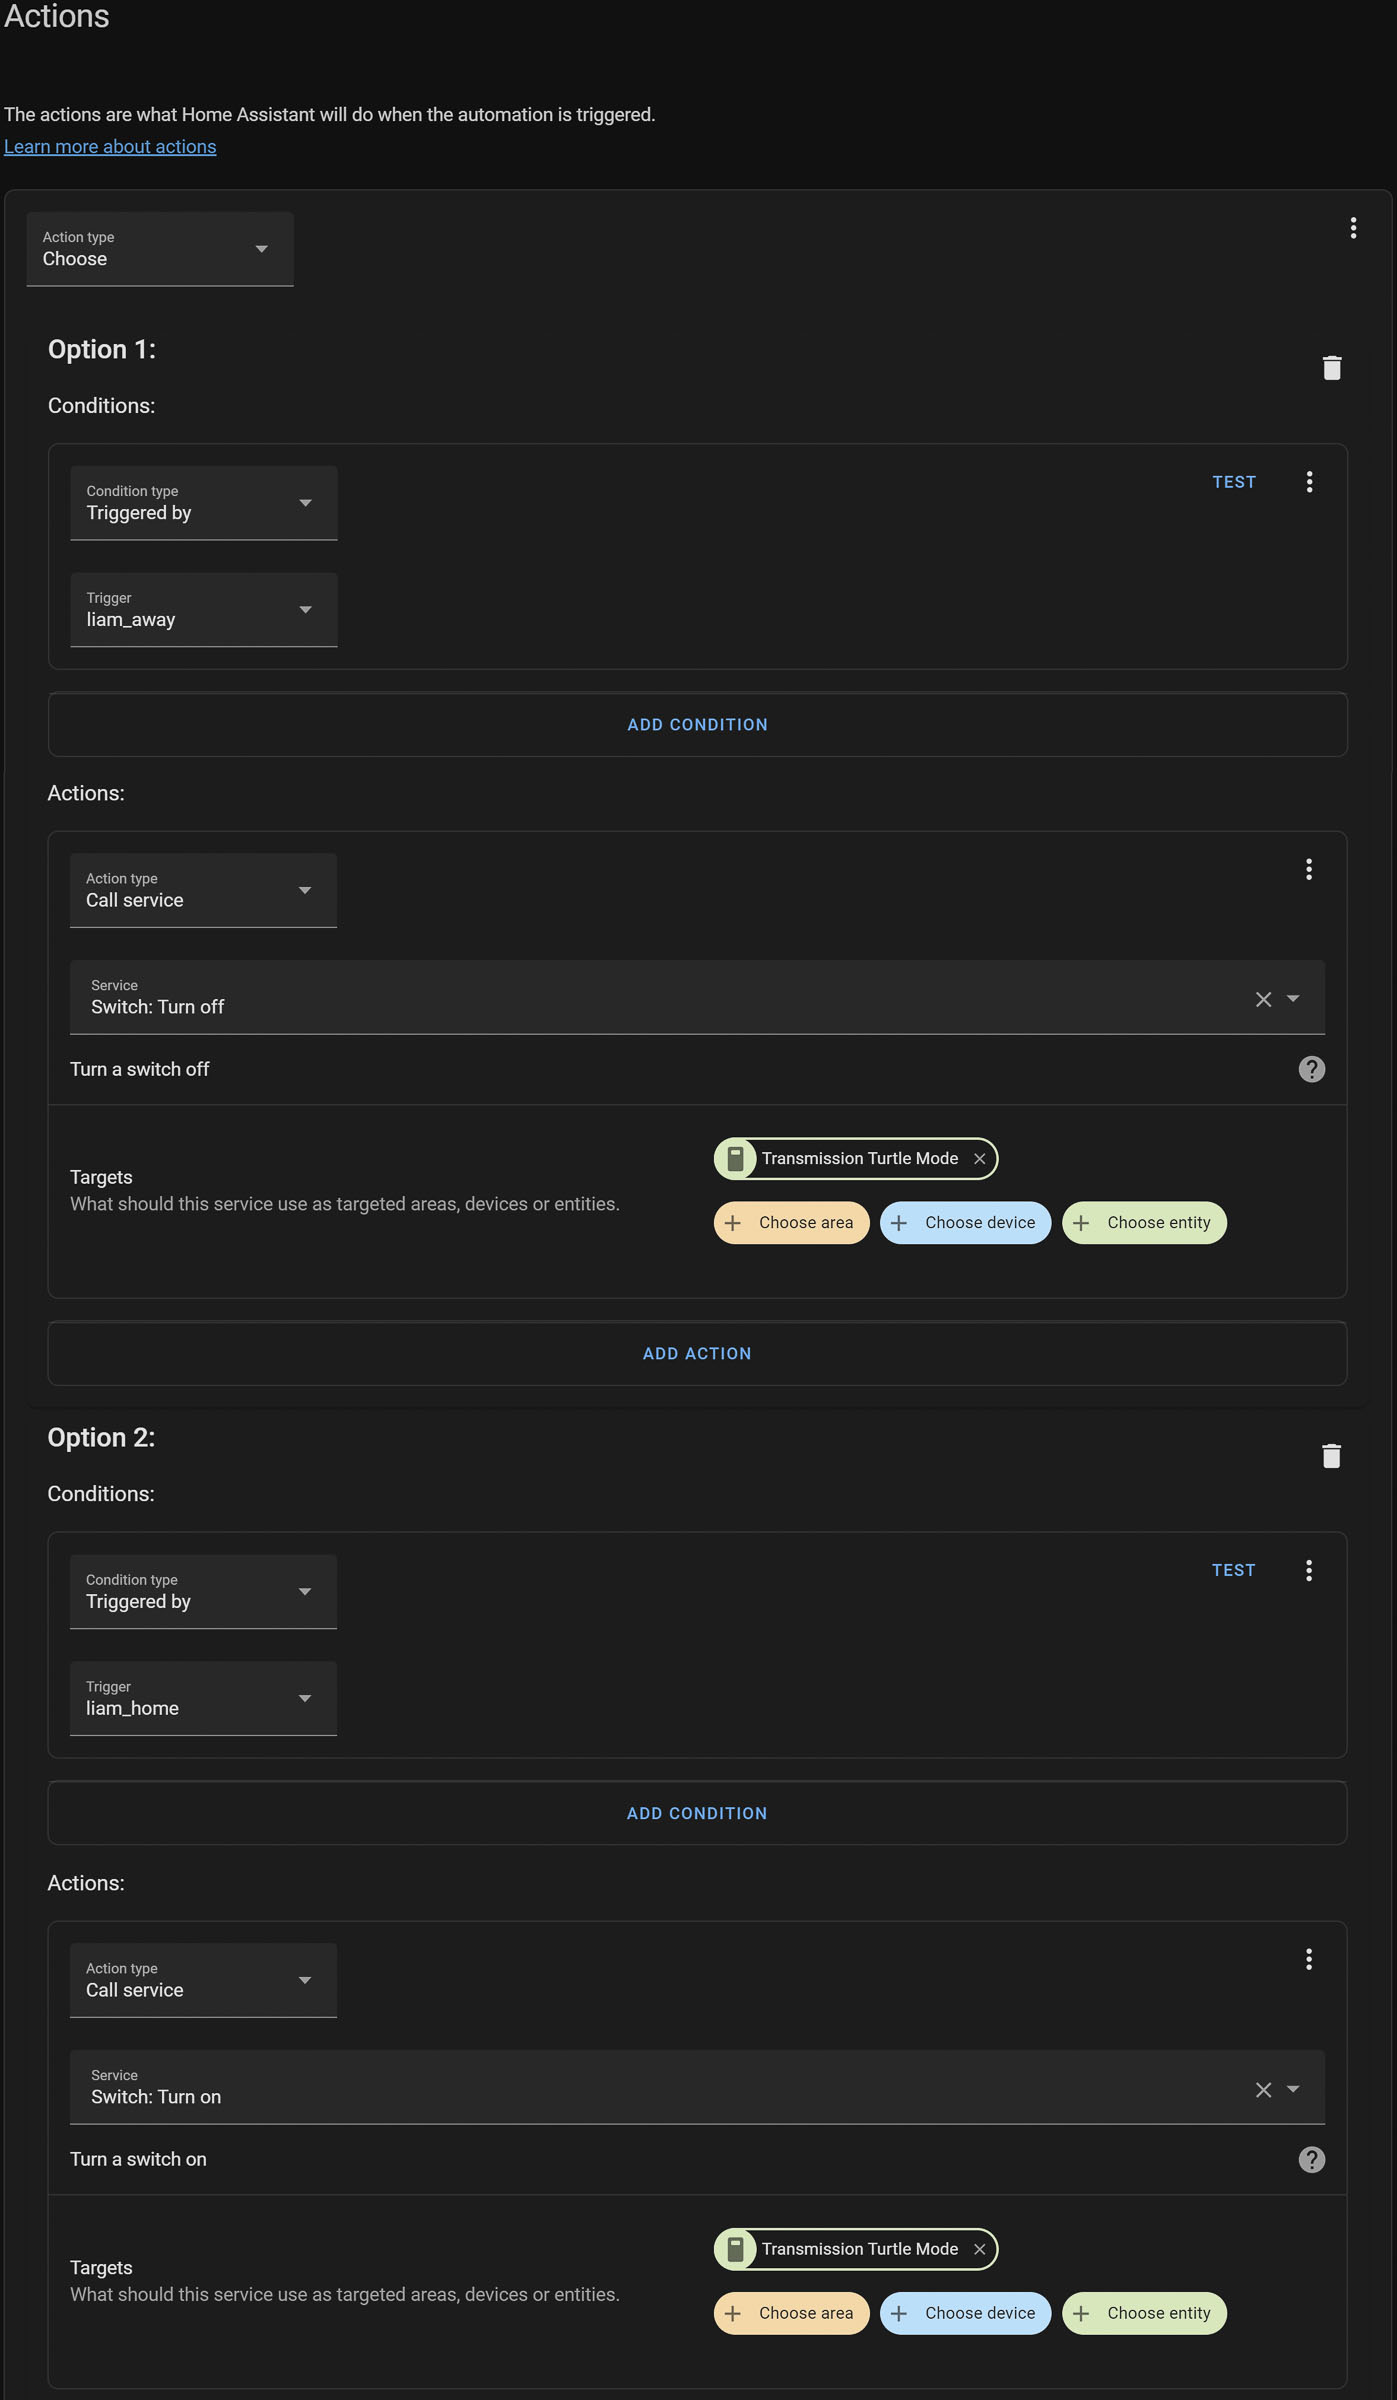
Creating the Transmission turtle mode automation in Home Assistant
Creating a “turtle mode” automation in Home Assistant can dynamically manage the bandwidth Transmission is allowed to take up. This not only ensures efficient use of your internet connection but also prevents your torrent activities from interfering with your daily online tasks. Here's a detailed guide on setting up this automation, making it straightforward even for beginners.
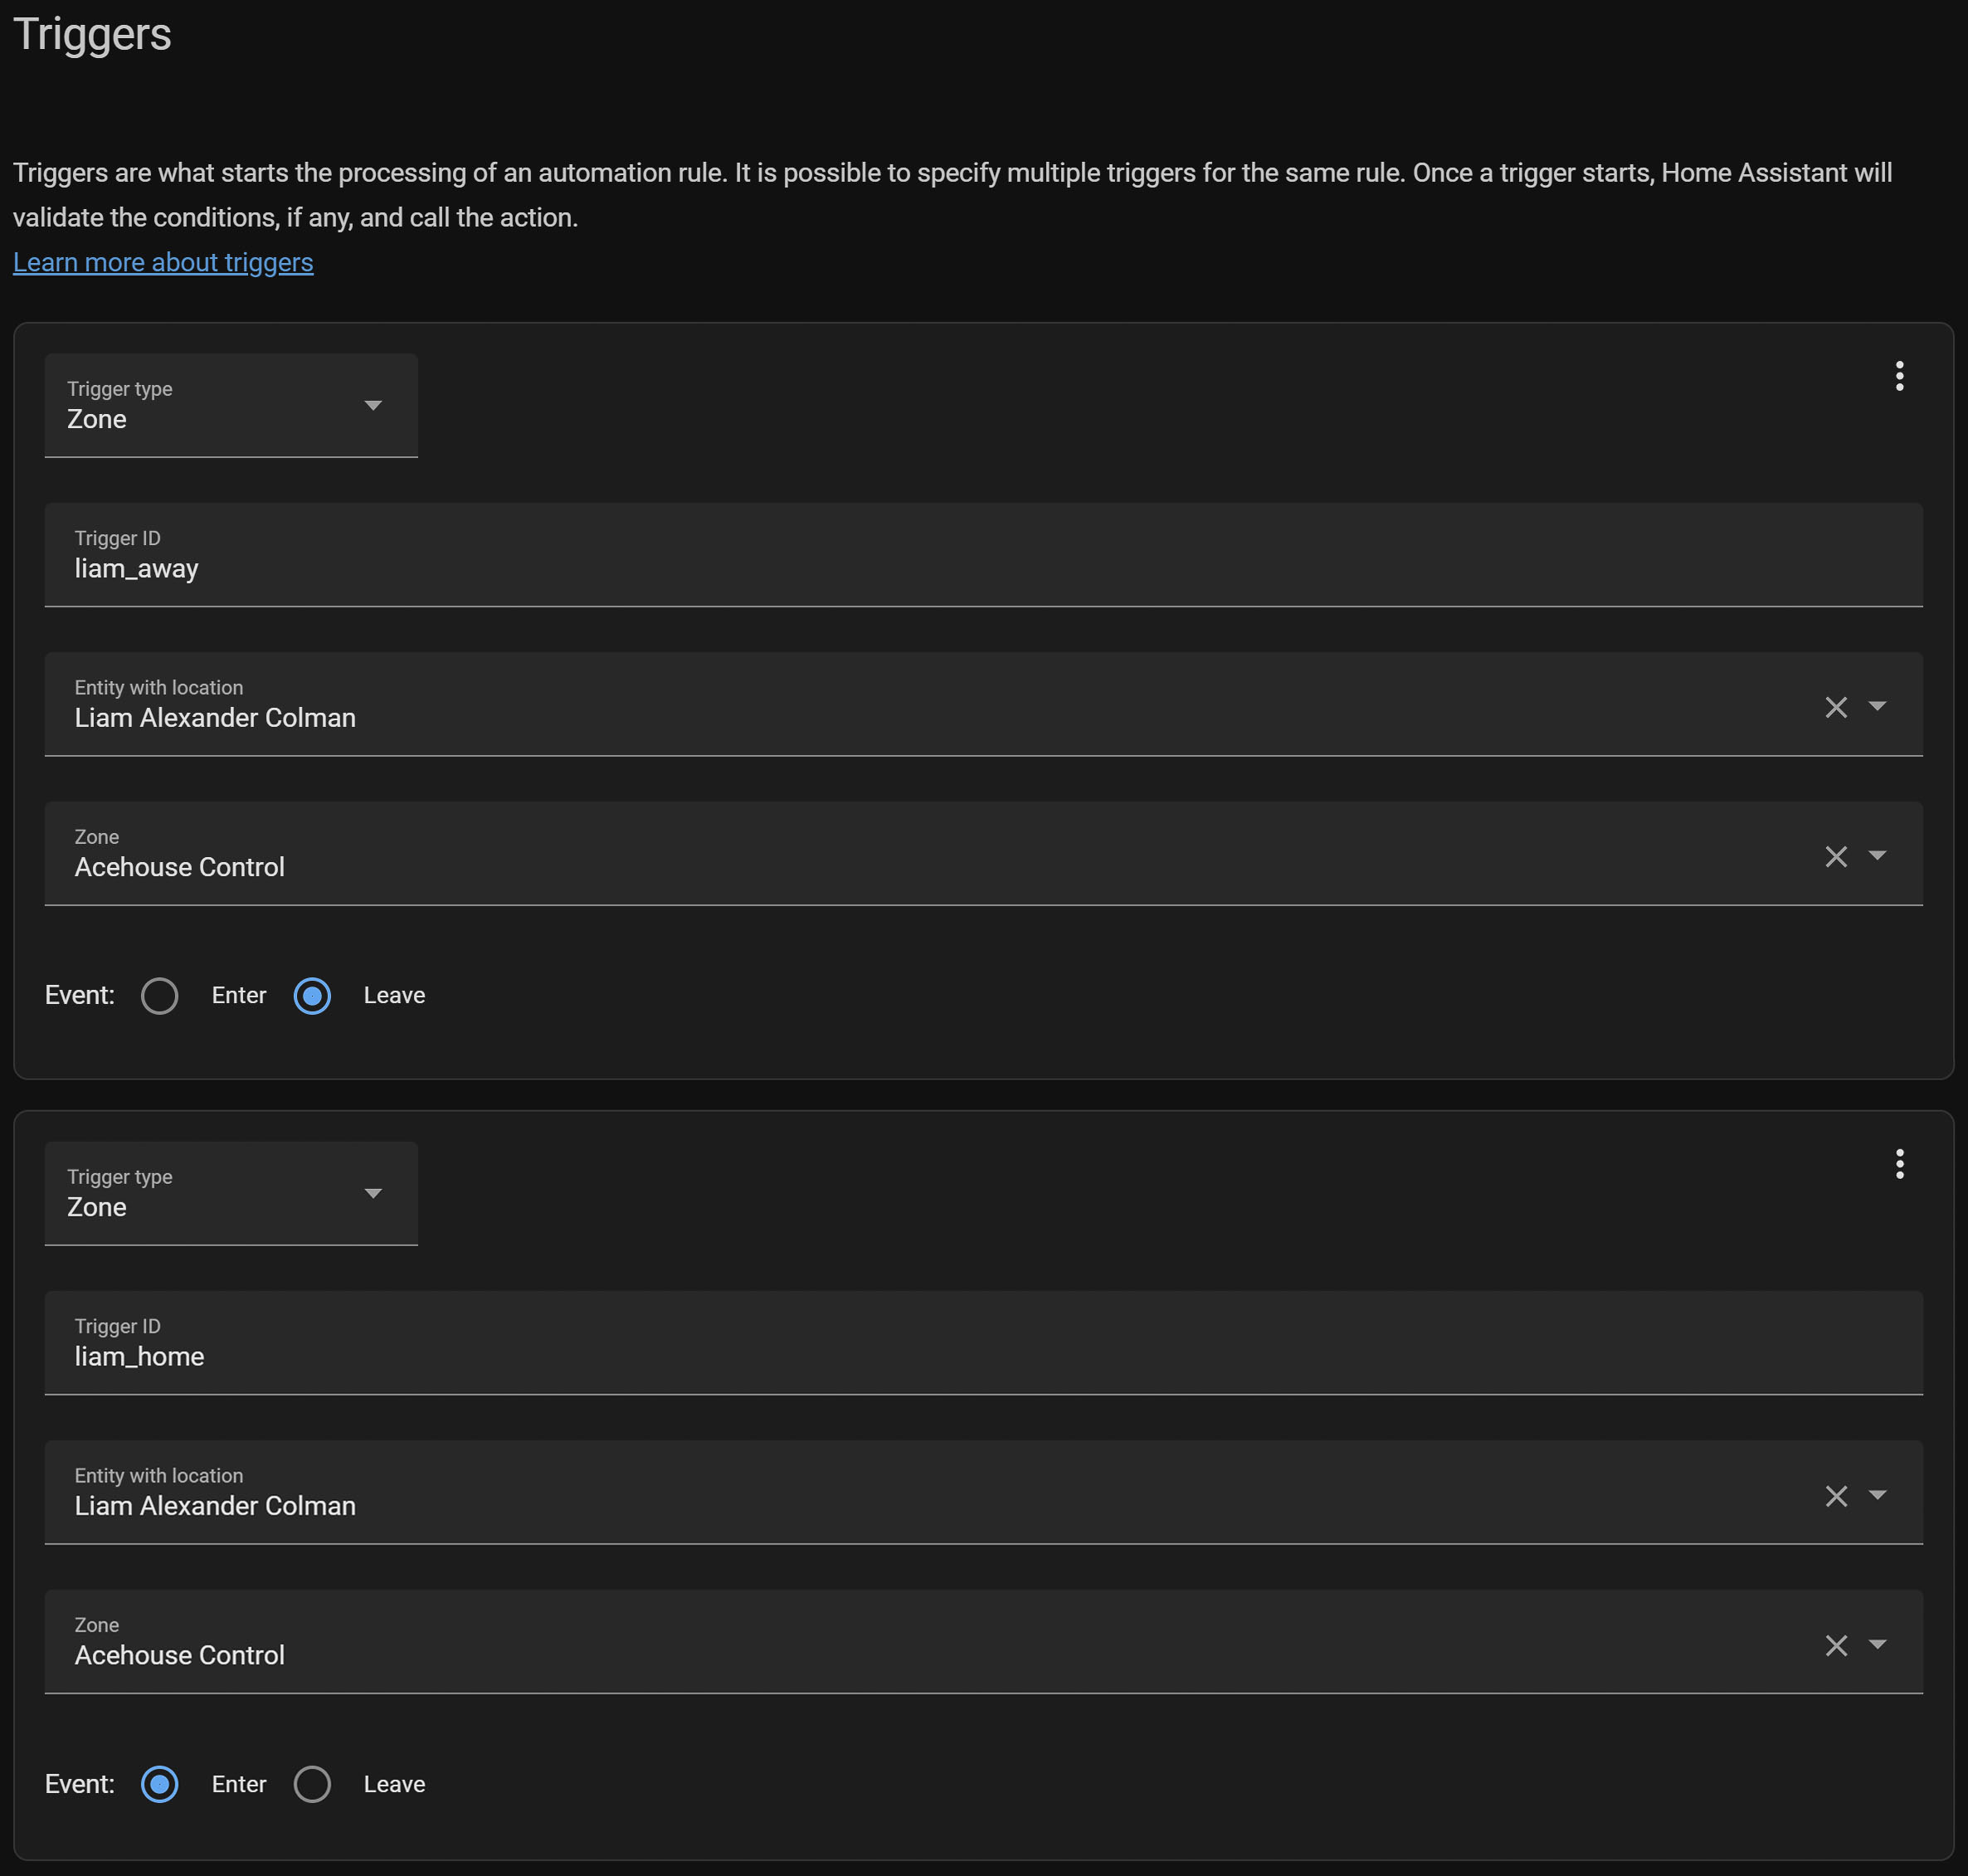
Step 1: Define the Triggers
The first step is to identify the conditions that will trigger the automation. Typically, these conditions are based on presence detection, such as when someone arrives at or leaves the home. You can use various methods for presence detection in Home Assistant, including mobile device tracking, network-based detection, or third-party services.
- When Someone is Home: This trigger activates turtle mode to limit Transmission's bandwidth usage, ensuring other internet activities are not disrupted.
- When Everyone is Away: This trigger deactivates turtle mode, allowing Transmission to use the full bandwidth for downloads.
Step 2: Set Up the Automation in Home Assistant
Navigate to the Automations section in Home Assistant and create a new automation.
- Name your automationfor easy identification, such as "Transmission Turtle Mode Automation."
- Select the Trigger Type: Choose the type of trigger based on your presence detection setup (e.g., device tracker, person entity, etc.).
- Define the Trigger Conditions: Specify the conditions that will trigger this automation, such as the presence status changing to "home" or "not_home."
- Choose the Action Type: Select 'Call Service' as the action type.
For Enabling Turtle Mode:
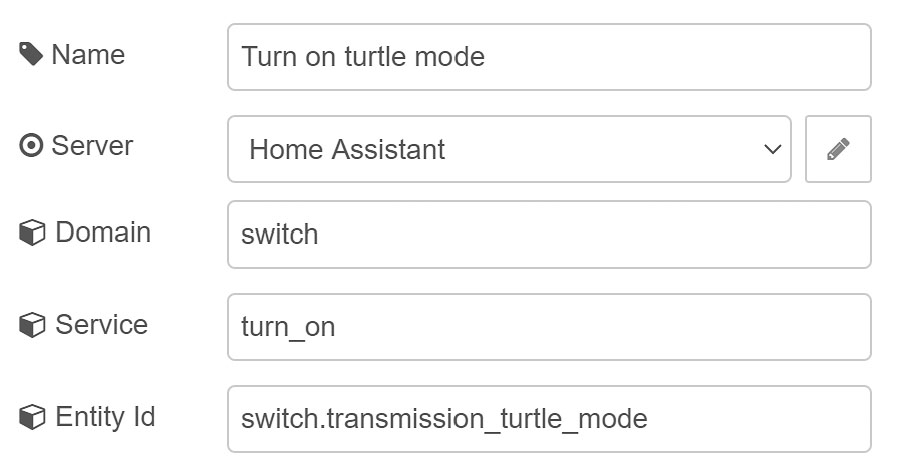
- Service: Choose the
transmission.set_turtle_modeservice. - Service Data: Set
"turtle_mode": trueto enable turtle mode.
For Disabling Turtle Mode:
- Service: Choose the same
transmission.set_turtle_modeservice. - Service Data: Set
"turtle_mode": falseto disable turtle mode.
Step 3: Refining the Automation with Conditions (Optional)
To make your automation even smarter, consider adding conditions. For example, you might only want to activate turtle mode during specific hours or when the network usage exceeds a certain threshold. After setting up your automation, it's crucial to test it under different scenarios to ensure it behaves as expected. You may need to adjust the triggers, conditions, or actions based on your observations.
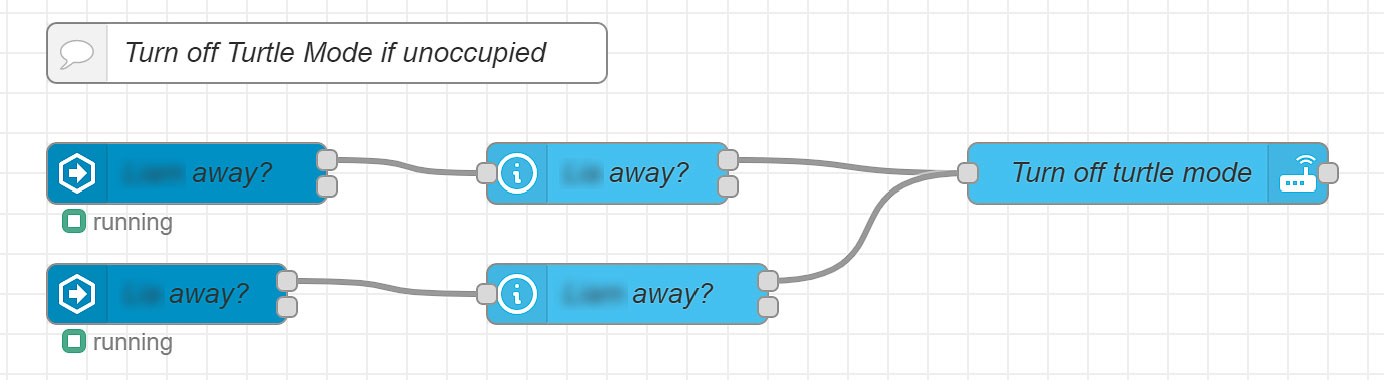
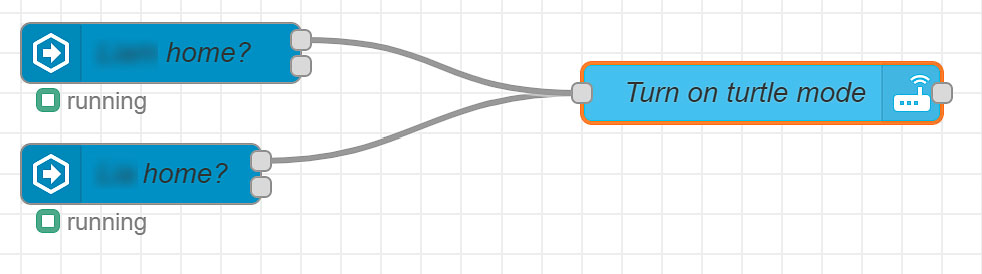
Creating the Transmission Turtle Mode Automation in Node-RED
Leveraging Node-RED for creating advanced automations offers a powerful and intuitive way to manage your smart home devices, including controlling Transmission's "turtle mode" based on household occupancy. Node-RED's visual programming environment simplifies the process of creating complex logic by connecting nodes in a flow-based manner. This section will guide you through setting up a Node-RED flow that automates Transmission's bandwidth usage, ensuring efficient internet consumption tailored to your presence at home.
Getting Started with Node-RED
Before diving into the automation, ensure you have Node-RED installed and accessible within your network. Node-RED can run on various platforms, including a Raspberry Pi, a server, or even directly on some routers. If you're using Home Assistant, you can easily add Node-RED through the Supervisor Add-on store.
Step 1: Plan Your Flow
The objective is to create a flow that adjusts Transmission's download speed based on the presence or absence of people in your home. The flow will have three main parts:
- Presence Detection: Determines if anyone is home or if everyone is away.
- Enable Turtle Mode: Activates turtle mode when someone arrives home.
- Disable Turtle Mode: Deactivates turtle mode when everyone is away.
Step 2: Set Up Presence Detection
- Input Nodes: Use input nodes to receive presence information. This could be from device trackers, network presence detection, or manual input switches. Configure these nodes to detect when someone arrives at or leaves the home.
- Function Nodes: Add function nodes to evaluate the presence data. You might write a simple JavaScript function to check if at least one person is home or if everyone is away.
Step 3: Control Transmission's Turtle Mode
- HTTP Request Nodes: Since Transmission offers a web API, you can use HTTP request nodes to send commands to enable or disable turtle mode. Configure these nodes with the appropriate API endpoints and authentication credentials.
- Template Nodes: Use template nodes to construct the JSON payload required by the Transmission API to set the turtle mode's status.
Step 4: Create the Flows
- Flow for Enabling Turtle Mode: Connect the presence detection nodes to a function node that checks if anyone is home. If so, link it to the HTTP request node configured to enable turtle mode in Transmission.
- Flow for Disabling Turtle Mode: Similarly, create a flow that triggers when everyone is away, connecting it to a different HTTP request node set to disable turtle mode.
Step 5: Implement Logic for Conditional Execution
- Switch Nodes: Incorporate switch nodes to direct the flow based on presence status. This ensures that turtle mode is only activated or deactivated under the correct conditions.
- Delay Nodes: Optionally, add delay nodes to prevent rapid toggling of turtle mode in cases of brief disconnections or presence detection anomalies.
Step 6: Testing, Debugging, and Deploying
- Debug Nodes: Utilize debug nodes to monitor the flow's operation and troubleshoot any issues. Pay special attention to the payload structure and HTTP request configuration to ensure successful API communication with Transmission.
- Deploying: Once satisfied with the setup, deploy the flow and observe its operation. Node-RED provides real-time feedback on each node's status, helping you ensure that the automation behaves as expected.
Further Ideas for Transmission Automations in Home Assistant
Although the initial setup is elementary, numerous ways exist to enhance these examples. Consider the following suggestions:
- Deactivate turtle mode during periods when everyone is asleep.
- Turn on turtle mode if someone uses your Plex server, even when you are away from home.
- Develop a kill-switch for moments that require maximum bandwidth (either physical or within the Home Assistant UI)
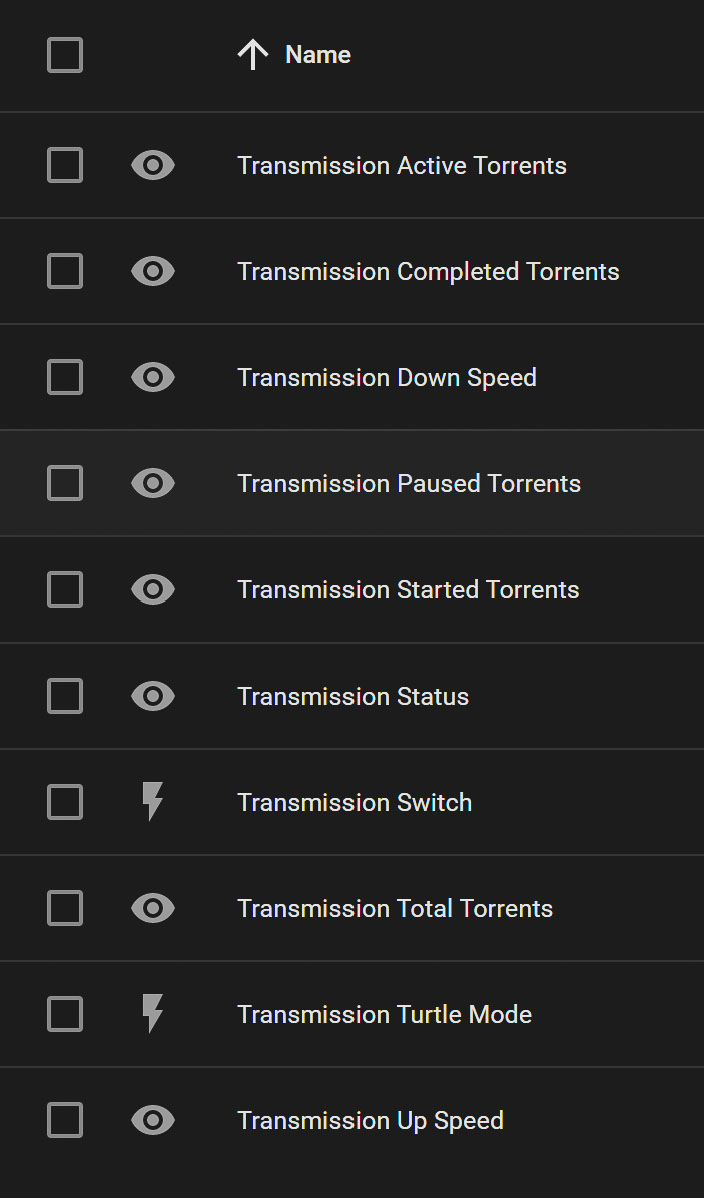
Transmission Sensors and Switches in the Home Assistant Dashboard
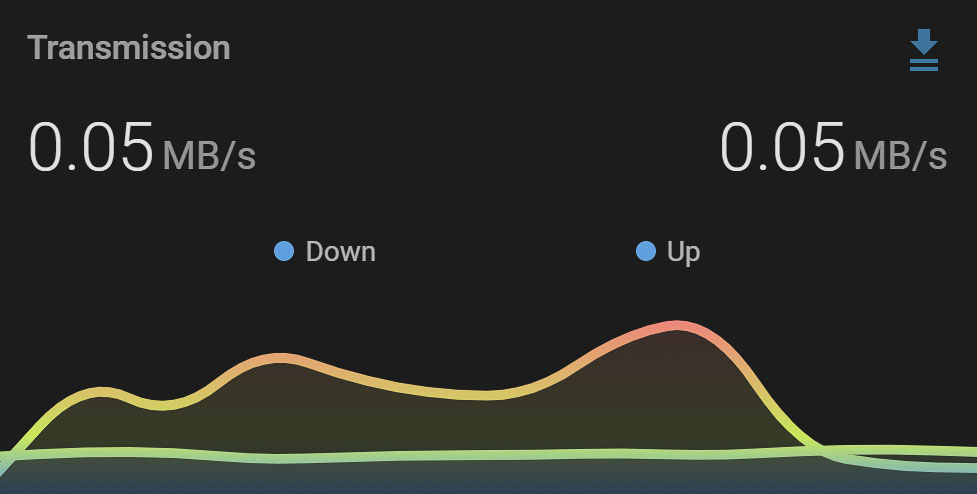
After setting up the Transmission integration in Home Assistant, why not create visually appealing graphs for your uploads and downloads? For example, the Lovelace Mini Graph Card displays data beautifully. Additionally, a substantial physical button for turtle mode can be established using a Button Card.