There's no denying that Raspberry Pis, especially the Raspberry Pi 4, are nifty little single-board computers. They're affordable, they don't spit out a ton of heat (so no need for active cooling in most scenarios), and they are incredibly energy-efficient, guzzling a mere 3.4-7.6 watts. They're perfect for beginners, but don't be fooled by their size – the Raspberry Pi 4 packs enough punch to power your Home Assistant even if you're a more advanced user juggling countless automations, scripts, and add-ons.
Contents
The Raspberry Pi 4’s Achilles’ Heel
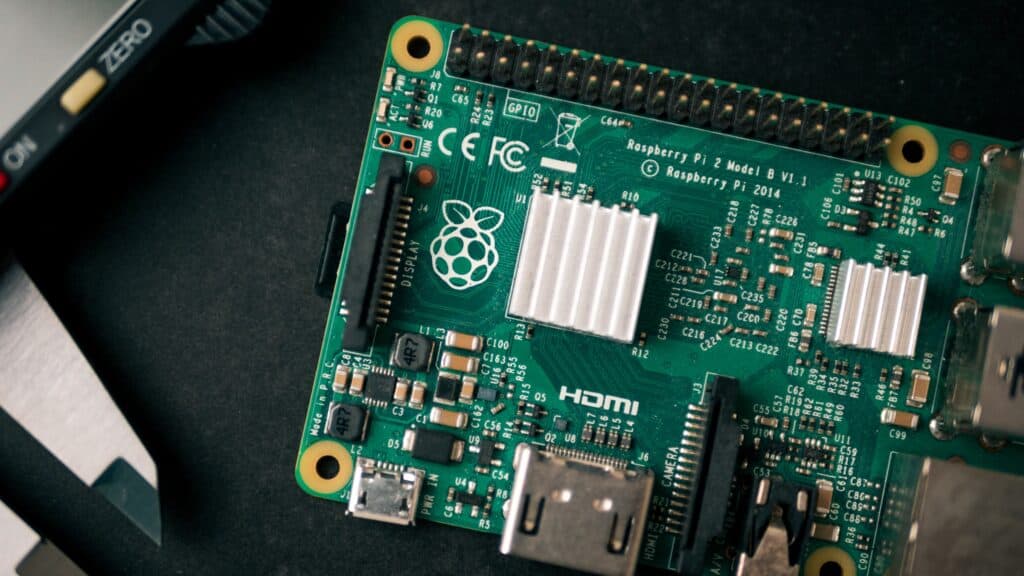
The Raspberry Pi 4, however, does have a significant Achilles' heel compared to Intel NUC systems and other platforms. It doesn't have any SATA or NVMe connectivity, and instead leans heavily on a microSD card for storage. Unfortunately, microSD cards aren't big fans of being written to repeatedly, which is something Home Assistant does fairly regularly. While you can opt for an endurance rated microSD card, it's more likely that down the line, you'll be craving something more reliable.

Solid-State Drives to the Rescue for Home Assistant
If you're running Home Assistant on a Raspberry Pi 4, the smartest way to go, is with an external SSD. Not only is it more reliable, but it could also provide faster speeds and more storage capacity. Sure, the price tag might be a bit higher, but can you really put a price on the reliability of your Home Assistant? I'll leave that for you to ponder.
Preparing the Raspberry Pi 4
To get Home Assistant to boot from an external SSD, you'll need to roll up your sleeves and prepare your Raspberry Pi 4. You'll still need a microSD card for this step, but don't sweat it if you don't have a high-end one – any old microSD card you have lying around will do the trick.
First things first, install Raspberry Pi OS (formerly known as Raspbian) onto the microSD card. The “Raspberry Pi OS (32-bit) Lite” image is perfect for this, since you only require shell access. No need to hook up your Raspberry Pi 4 to a monitor and keyboard. To flash the image onto the card, you can use an app like balenaEtcher. Once the image is flashed, you can enable SSH by creating a file named “ssh” (sans extension) on the boot partition of the microSD card. To accomplish this, open Notepad, save an empty file, and select “All files” under “Save as type:”. If you see two partitions in your file explorer, the smaller one is the boot partition.
With the microSD card ready to rock, you can remove it from your computer and pop it into the Raspberry Pi 4. Then, just connect a network cable and boot up the Raspberry Pi 4 by plugging in the power cable.
How to upgrade your Raspberry Pi 4 Bootloader Firmware
You will need an SSH client to access the Raspberry Pi 4 and the one I recommend is MobaXterm, though you can now also use the Windows Terminal. Once installed, you can look up the Raspberry Pi 4’s IP on your router and enter it in MobaXterm by clicking on “Session” and choosing “SSH”.
Now that you're in the driver's seat, it's time to update the bootloader update utility. How do you do that? Just type in these magic incantations (or, if you're not feeling particularly wizard-like, you can just copy and paste them into MobaXterm):

sudo apt update
sudo apt full-upgrade
sudo reboot
After your Raspberry Pi 4 has stretched its legs and booted up again, it's time to see if there are any updates to the bootloader. This can be done with the following command:
sudo rpi-eeprom-updateIf there's an update waiting in the wings (the shell will inform you with a “*** UPDATE REQUIRED ***” message), you can install it using these commands:
sudo rpi-eeprom-update -a
sudo reboot
With your Raspberry Pi 4 bootloader all shiny and updated, you can then safely shut down the system using the following command. This is a good practice as it ensures the safety of your microSD card:
sudo shutdown -h nowInstalling Home Assistant on an External SSD
Presently, only the HassOS development builds are capable of booting from an external SSD, so you might encounter a bug or two along the way. To get started, download the latest Development 5 build X for the Raspberry Pi 4 from GitHub (currently hassos_rpi4-64-5.4.img.gz).
Once your download is complete, you'll need to flash the image using balenaEtcher. The twist this time is that you'll be flashing it to your external SSD, not a microSD card. When that's done, plug the SSD into your Raspberry Pi 4 and power it on by reconnecting the power cable. Home Assistant should boot up just as it would from a microSD card. Give it a moment to find its feet, and you're all set!

Hi, I have followed your guide but used a Samsung 970 Plus NVMe – instead of running faster than the SD card, it is painfully slow with Home Assistant. Just opening the account took nearly an hour and adding each integration was around 40 min. What am I doing wrong? Im using a raspberry PI 4 8GB. I have the NVMe plugged into the top blue USB. Also the NVMe is running really hot in this case
“M.2 NVMe SSD Enclosure, Aluminum USB C 3.1 Gen 2 to M-Key M&B-Key NVMe PCIe 10Gbps External Enclosure, Fits 2230/2242/2260/2280 NVMe PCIe SSD, Tool-Fr”
any help is much appreciated. Thank you in anticipation.
Hello,
I think you need to update raspberry firmware with this command :
sudo apt update
sudo apt full-upgrade
sudo rpi-update
Thank you very much for this procedure.
It works for very (so far) on RPi 4 2GB with USB SSD 110 GB in a Argon One enclosure.
Can you tell me how I can install the Argon One scripts for controlling the internal fan in the enclosure?
After connecting the SSD to the RPi my terminal is no longer accessible.
Thanks for your help and understanding in advance.
Regards
Arjen
Netherlands
Hi there. Unfortunately I have no experience with that case. I did find this add-on you could try installing: https://github.com/adamoutler/HassOSArgonOneAddon