
If you're a user of Home Assistant and the renowned task management app TickTick, you might have encountered challenges in integrating these platforms due to the lack of an official API. This guide addresses this issue by providing a detailed solution on how to integrate TickTick with Home Assistant. It covers the prerequisites, installation process through HACS (Home Assistant Community Store), and configuration steps for integrating TickTick with Home Assistant. By following these instructions, you can manage your TickTick tasks seamlessly within Home Assistant.
Contents
Why Integrate TickTick With Home Assistant
Integrating TickTick with Home Assistant brings several benefits, especially for those who find TickTick's task management capabilities superior to other options like Microsoft To Do and Todoist. However, TickTick's lack of an open and documented API, something that Todoist does offer, has been a significant barrier. Fortunately, developer BeryJu has created a custom component that enables integration with TickTick. It's important to note that this integration, based on reverse-engineering the TickTick web app, may stop working without warning due to its unofficial nature.
An open and documented API for TickTick would significantly enhance its compatibility with Home Assistant. If you are keen on a more official and comprehensive integration, consider expressing your interest on the TickTick forums. This feedback can be crucial in advocating for an open API, a feature many Home Assistant users have eagerly awaited.
Requirements for Integrating TickTick With Home Assistant
This integration, while more basic than Todoist's official integration, offers basic functionalities such as adding tasks, assigning them to projects, and setting due dates. Ensure you have a TickTick password set up, as the integration does not support sign-in via third-party platforms like Google or Facebook.
How to Add the TickTick Integration to Home Assistant
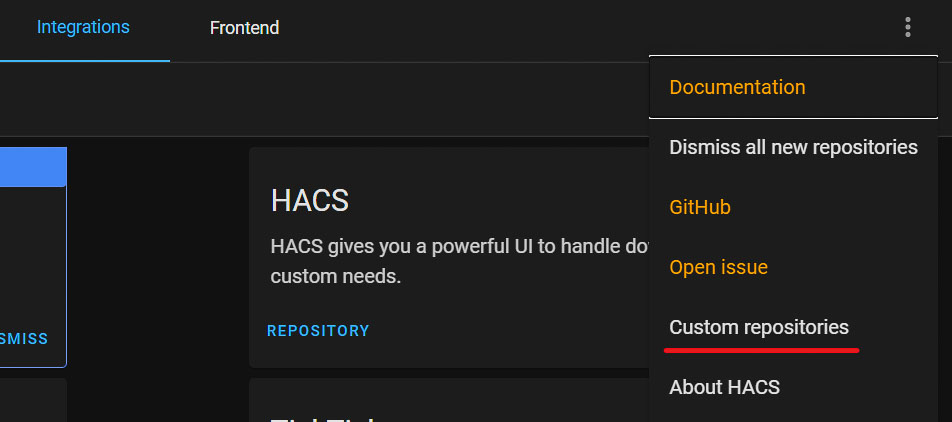
Installing the TickTick custom component is streamlined through HACS (Home Assistant Community Store). In Home Assistant's web interface, navigate to HACS, select Custom repositories in the top-right corner, and add https://github.com/BeryJu/hass-ticktick as a new repository. Once installed and after restarting Home Assistant, the component will be operational.
Configuring the TickTick Integration in Home Assistant
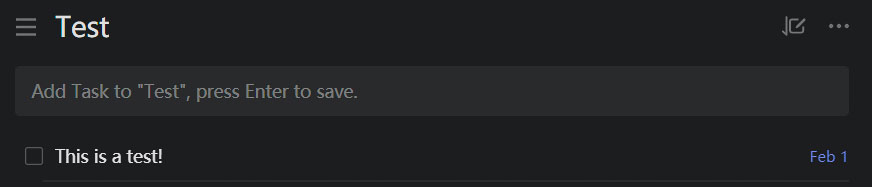
Configure the integration via the Integrations section in Home Assistant's configuration menu. Add TickTick, input your username and password, and you're set to integrate tasks using the ticktick.add_task service in Home Assistant. This service can be included in automations or scripts, with parameters for titles, due dates, and project IDs:
title: This is a test!
due_date: 2021-02-01
project: YOUR_PROJECT_ID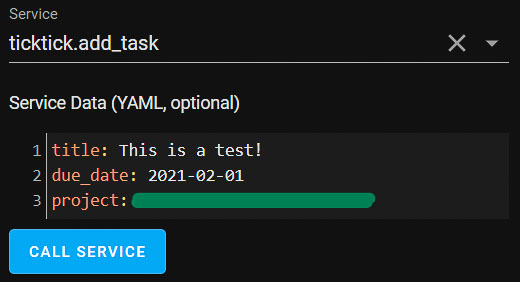
Locating Your TickTick Project ID
To find your TickTick project ID, visit the desired project in TickTick using a browser, not the app. The URL will be formatted as https://ticktick.com/webapp/#p/YOUR-PROJECT-ID/tasks. The ID is part of the URL, located between #p/ and /tasks.

I have been trying to figure out home assistant, but many tutorials are not beginner friendly. Would you mind answering a couple of questions:
– How does the ticktick.add_task service work? How can I get this added to the dashboard?
– Where can I add the Ticktick project IDs?
– Is it possible to get an overview of tasks that I have scheduled for today / upcoming few days?