
In this guide, I will be showing you how to harmoniously integrate your MikroTik router with Home Assistant. This integration allows you not only to monitor the presence of people's devices, but also control things such as the physical interfaces, NAT rules, and filters. While MikroTik may not be the networking world's equivalent of the Beatles like Ubiquiti, Netgear, or D-Link, it does command a dedicated following with its enthusiast-grade networking gear that dances to the rhythm of the highly optimized RouterOS.
Contents
How MikroTik became the enthusiast's preferred choice
Originating from Latvia in 1996, MikroTik has evolved to become a global provider of routers and wireless ISP systems. Their products, including both hardware and software, facilitate Internet connectivity in a multitude of countries worldwide. Their product range is expansive, but the heart of their offerings lies in the powerful RouterOS. RouterOS is an operating system specifically designed for routers, based on the Debian GNU/Linux kernel. It's bursting with a wide range of features like routing, firewall, hotspot, VPN, bandwidth management, and web proxy. The list goes on, truly embodying the 'more the merrier' ethos.
Among MikroTik's extensive line-up, a few gems shine particularly brightly. The hAP ax² and hAP ax³ are two such shining stars. These powerful Wi-Fi 6 supporting access points have become a favourite among enthusiast. Then there are the L009UiGS-RM and L009UiGS-2HaxD-IN devices, providing a stable backbone for any network. The former is a no Wi-Fi device, while the latter supports 2.4 GHz Wi-Fi 6. Both devices feature robust dual-core ARM CPUs, 512 MB RAM, and a full-sized USB port, making them ideal for running custom container projects. And with a price tag of US$119 and US$129 respectively, they offer quite a bang for your buck.
Preparing your MikroTik router
Before we start setting up the integration in Home Assistant, we will want to make sure we can do while keeping our MikroTik devices as secure as possible. To achieve this, you will want to set up a new user, as the integration does not require the privileges the admin user has. While MikroTik routers do have a web interface, the easiest way of configuring them is by using WinBox, which can be downloaded directly from the MikroTik website. This is a portable application, so there is no need for an installation, and you can just launch the application.
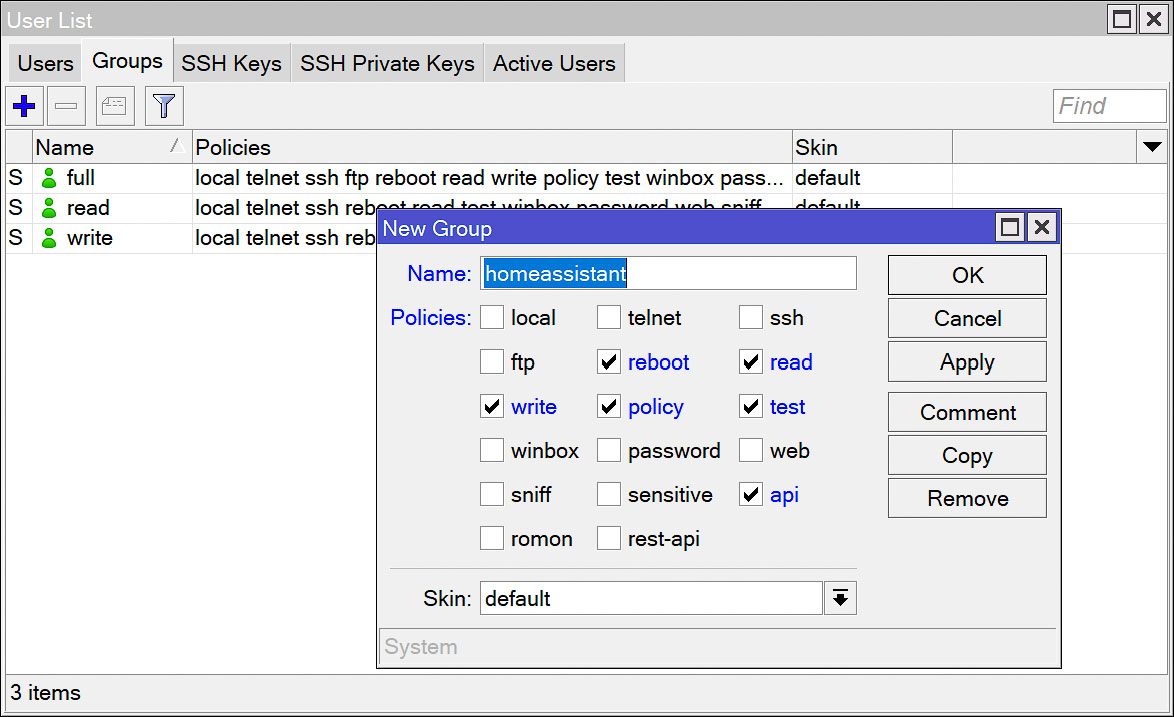
With WinBox up and running, log into your MikroTik router using the admin account. Make a beeline for the user list, nestled within the system's settings. Before you add a user, let's create a new group with these policies on their checklist:
- reboot
- read
- write
- policy
- test
- api
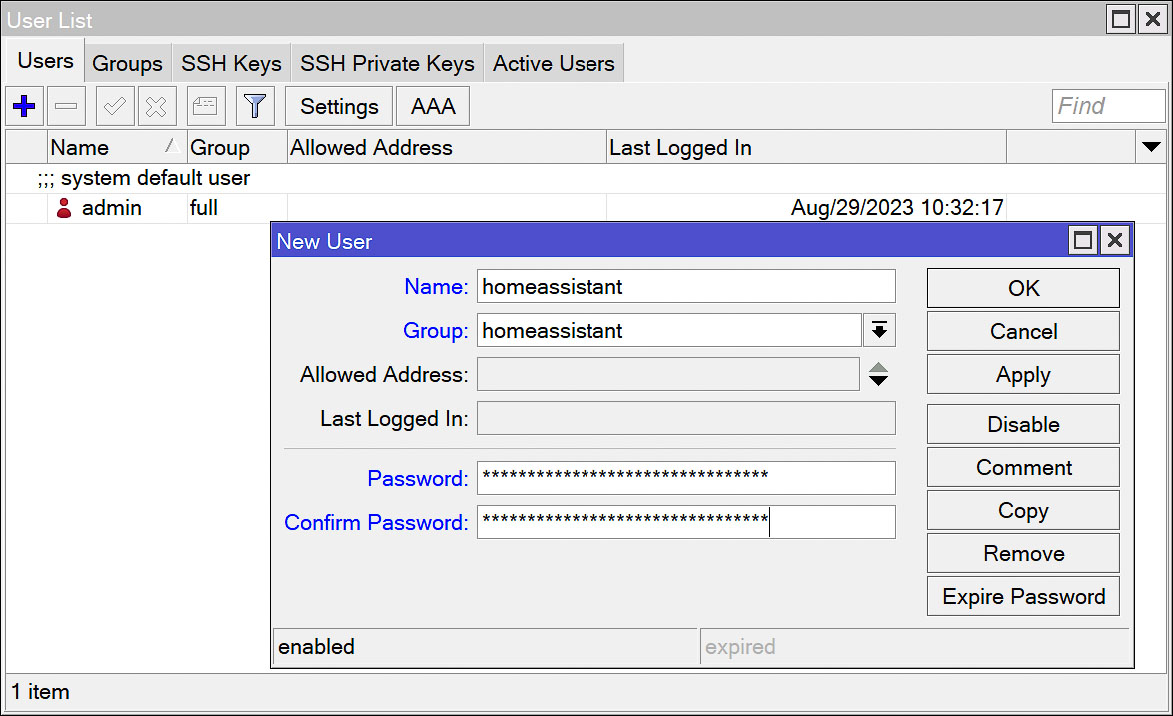
Next, create a user named homeassistant, assign it to the freshly minted group, and fortify it with a strong password. With that, the MikroTik router's configuration is all set, and we're ready to turn the page to the next chapter.
Installing the MikroTik Router custom integration
While Home Assistant does provide a native integration with MikroTik routers, its functionality is relatively limited, only tracking devices connected to your router. To overcome these shortcomings, consider utilizing the enhanced custom integration designed by Tomaae.
The recommended and most straightforward method to incorporate this custom component into Home Assistant is via the Home Assistant Community Store (HACS). A simple search for MikroTik should do the trick. If not, you can manually add the custom repository: https://github.com/tomaae/homeassistant-mikrotik_router (or use this link to have it set up). After installing the component, a swift system reboot will ensure everything's up and running like a well-oiled machine.
Adding the MikroTik integration to Home Assistant
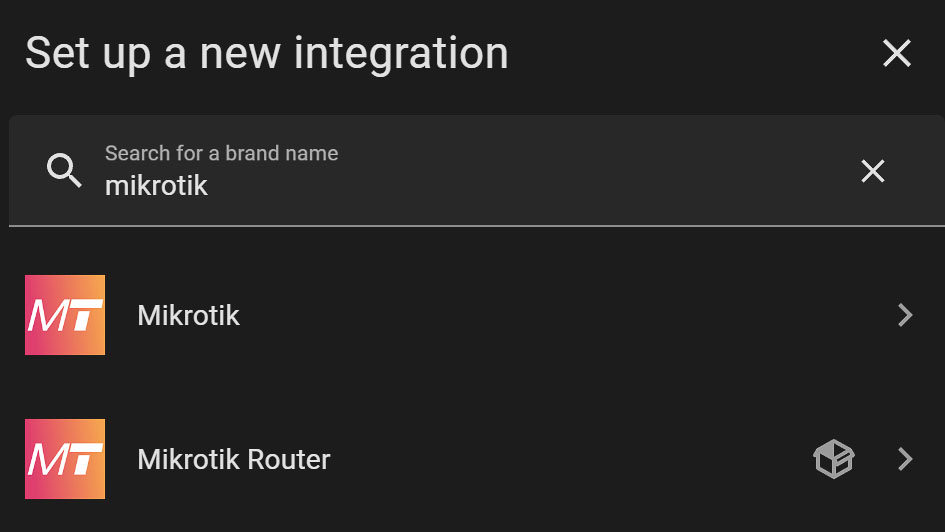
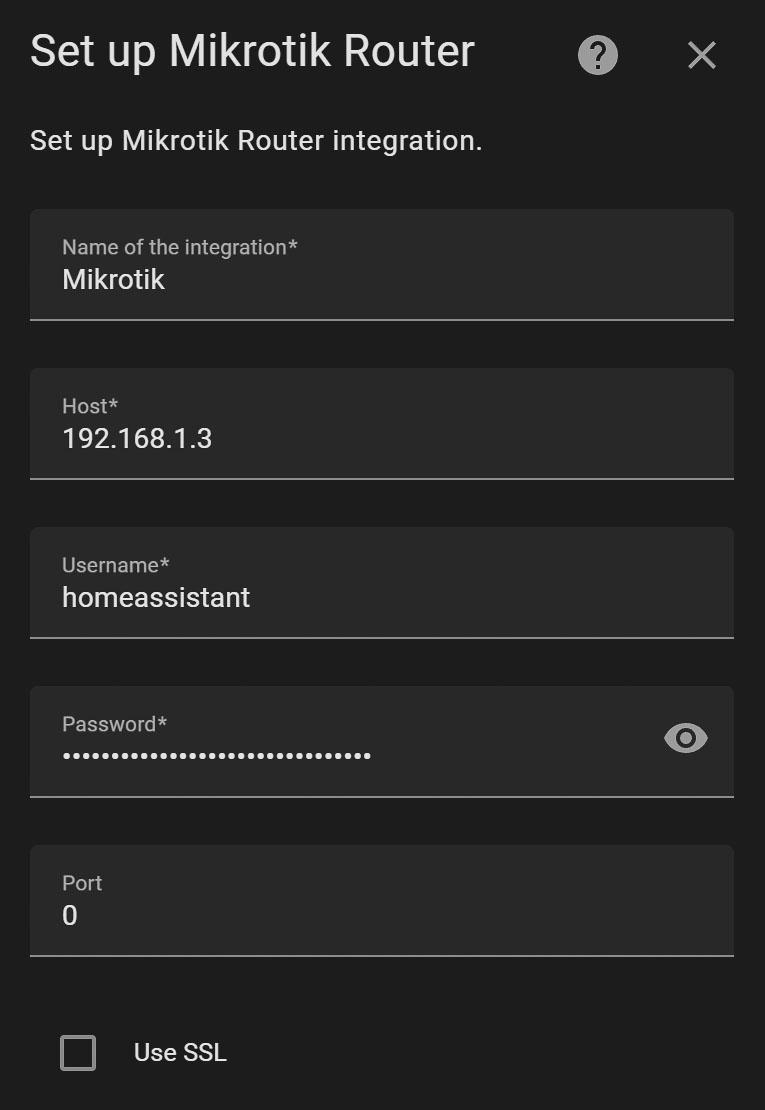
Back in the Home Assistant Dashboard, navigate to the integration overview located in the settings. From there, add a new integration and search for MikroTik. You'll now have two options: the official MikroTik integration, which we're politely side-stepping, and the custom MikroTik Router integration we've just installed. Choose the latter, and you'll be prompted to name your integration and input your router's port (leave it set to zero to use the default port), username, and password. For the latter two, just enter the details you set up earlier.
Now, we hit a slight bump in the road. This custom integration is showing its age a bit. The most recent update was nearly a year ago, so it doesn't fully utilize the benefits of newer versions of Home Assistant. However, don't fret; the component is still under active development, and a significant update is expected in the foreseeable future.

Configuring the MikroTik integration with Home Assistant
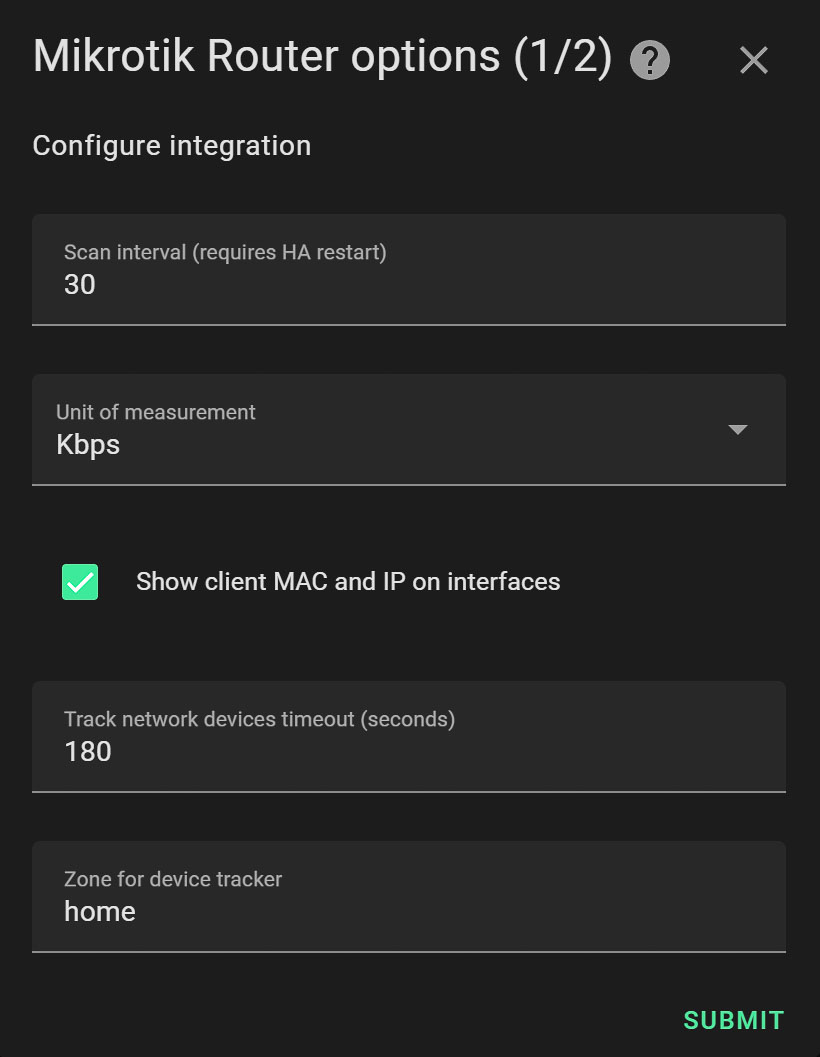
Instead of being greeted by a nice overview, with categorized entities already being enabled or disabled, you will need to click on the integration and then configure the router previously set up. The configurator allows you to set the scan interval and select the unit of measurement (bps, Kbps, Mbps, B/s, KB/s, or MK/s). You can also choose whether you want the client's MAC and IP addresses to be shown in the interface's properties. The final two options allow you to set the time a device has to be disconnected, to be considered away from home, and the location of the router itself.
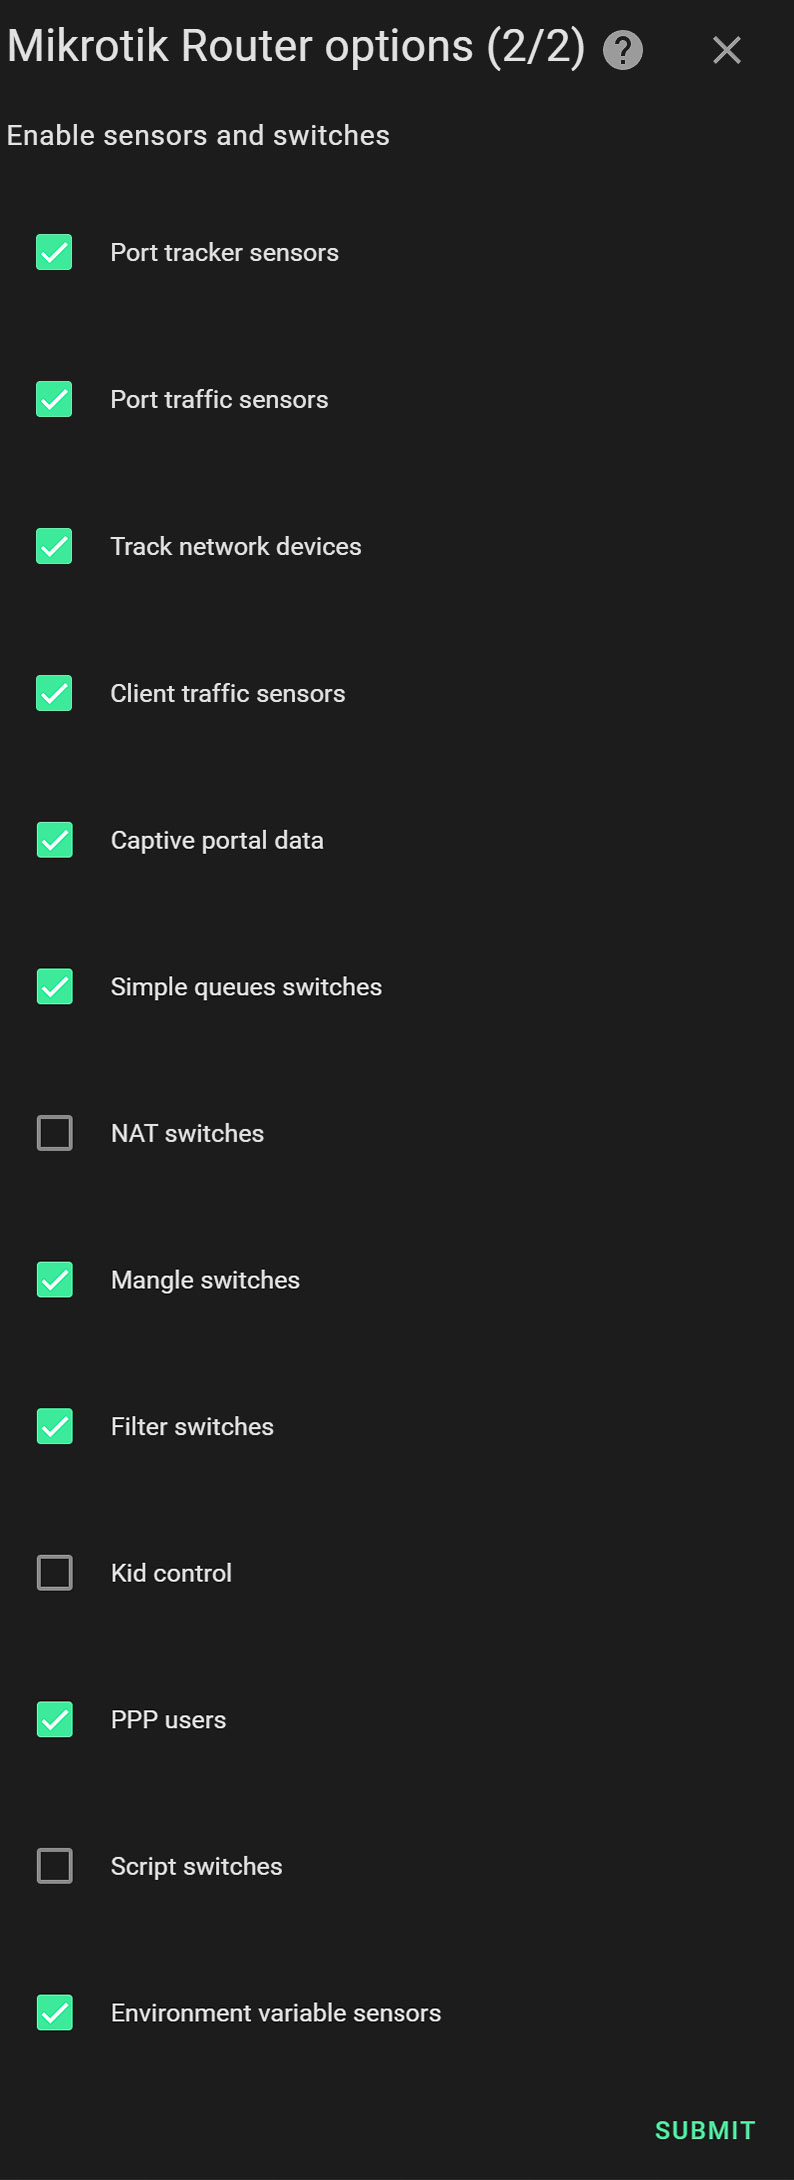
On the subsequent page, you are prompted to enable the sensors and switches you wish to make use of. My recommendation is to enable everything and disable the entities you don't wish to have using Home Assistant. It's a much simpler and quicker process. I suggest enabling everything initially, then deactivating any entities you find unnecessary via Home Assistant. It's a more straightforward and efficient process this way. With the router configured and ready to go, the setup is now complete. One of the perks of this integration is its capacity to handle multiple MikroTik devices, so feel free to repeat the process for any additional routers in your smart home arsenal.
Unleash the Power of MikroTik Integration
Below is the list of MikroTik entities that the integration will grant you access to in Home Assistant. As with any other integration, you can use any of these in automations, scripts, or just display them in the Home Assistant Dashboard. Whether you're employing them in automations, integrating them into scripts, or showcasing them on your Home Assistant Dashboard, these entities are more than just tools – they are potential game-changers. They furnish you with comprehensive data, enabling you to troubleshoot your MikroTik routers with precision. Worried about system overheating? Stress no more. But it's not just about problem-solving. The MikroTik integration gives you peace of mind, ensuring your digital ecosystem operates at its optimal level.
Switches and buttons
The following actions are available to you, after having integrated your MikroTik router with Home Assistant. What exactly is displayed depends on your model and also the configuration of RouterOS.
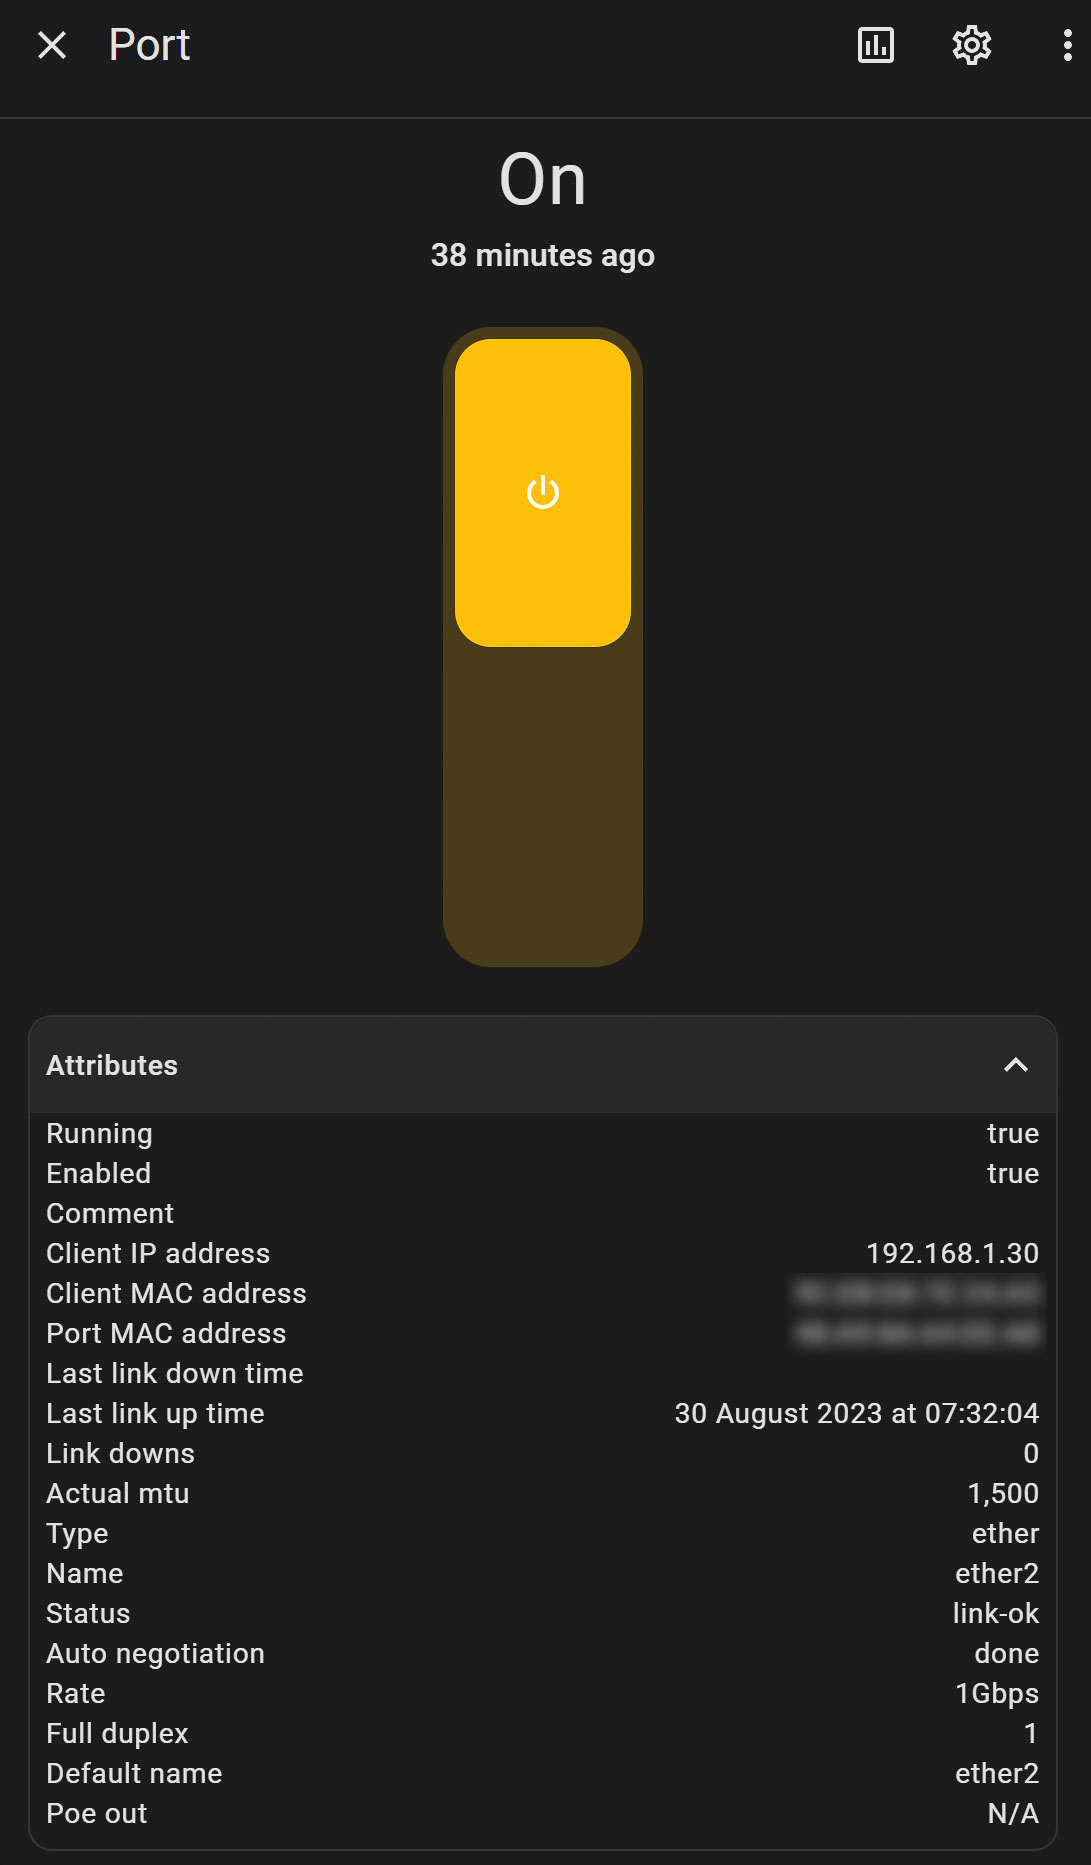
- Enable/disable interfaces: Switch on or off the communication paths of your router with a click.
- Enable/disable NAT rule switches: NAT (Network Address Translation) rules, which dictate how public and private network addresses interact, can be toggled with ease.
- Enable/disable Simple Queue switches: Manage bandwidth allocation with the flick of a switch.
- Enable/disable Mangle switches: This gives you control over packet marking for specific traffic flows.
- Enable/disable Filter switches: Decide which packets pass through your router and which get the boot.
- Execute scripts: Run predefined scripts for advanced network configurations.
- POE status, control, and information: Check on, control, and learn about the power over Ethernet (POE) capabilities of your router.
- Kid Control: Manage your little ones' internet access with ease.
Monitoring
- Monitor and control PPP users: Keep tabs on Point-to-Point Protocol users and control their access.
- Monitor UPS: Stay updated on your Uninterruptible Power Supply status.
- Monitor GPS coordinates: Track the geographical data of your router (handy for mobile setups).
- Captive Portal: View and manage the status of your login interface for public Wi-Fi networks.
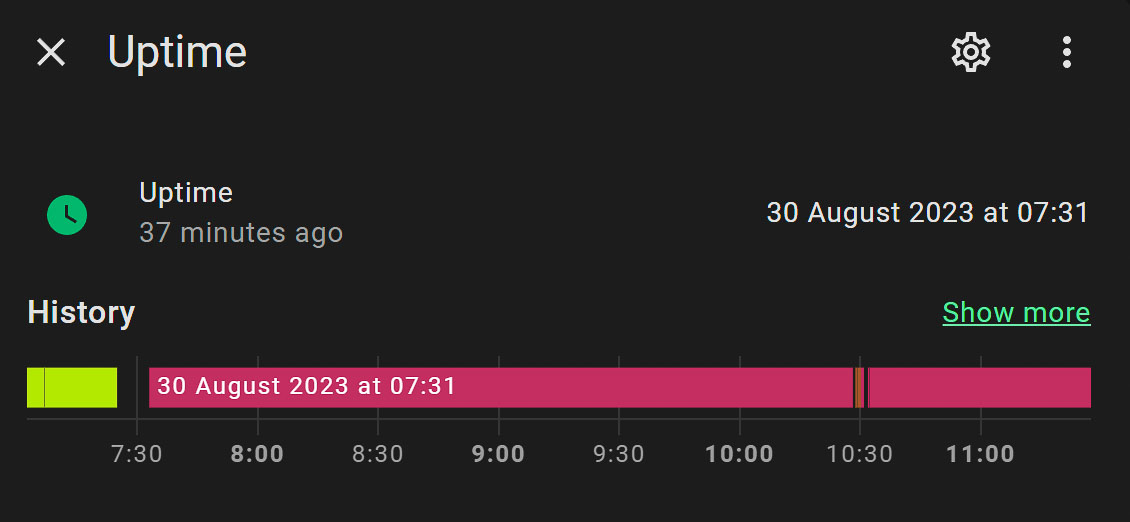
- View environment variables: Get insights into the operating conditions of your router.
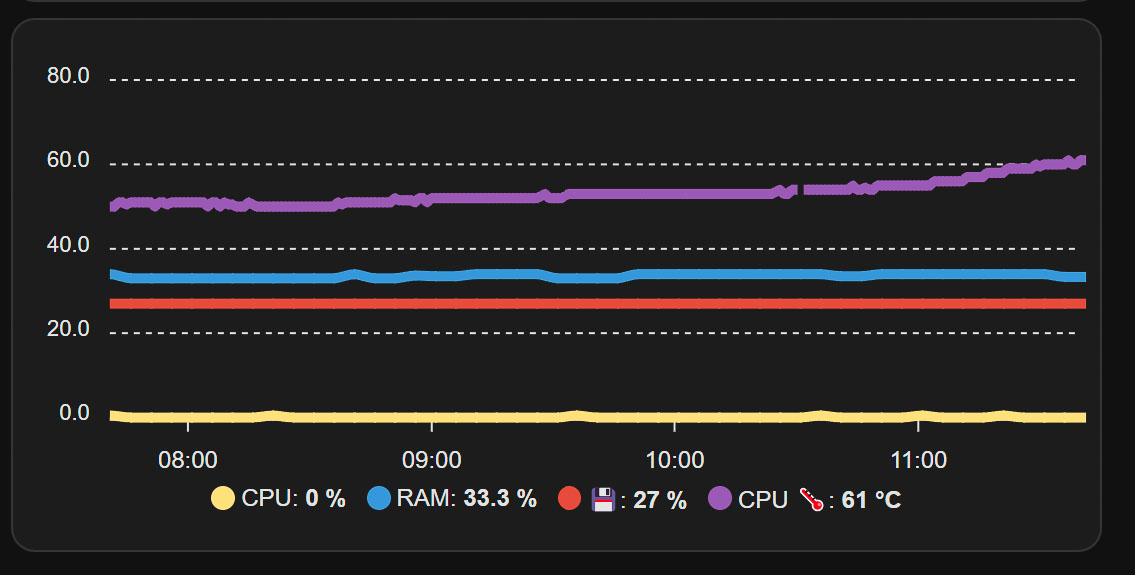
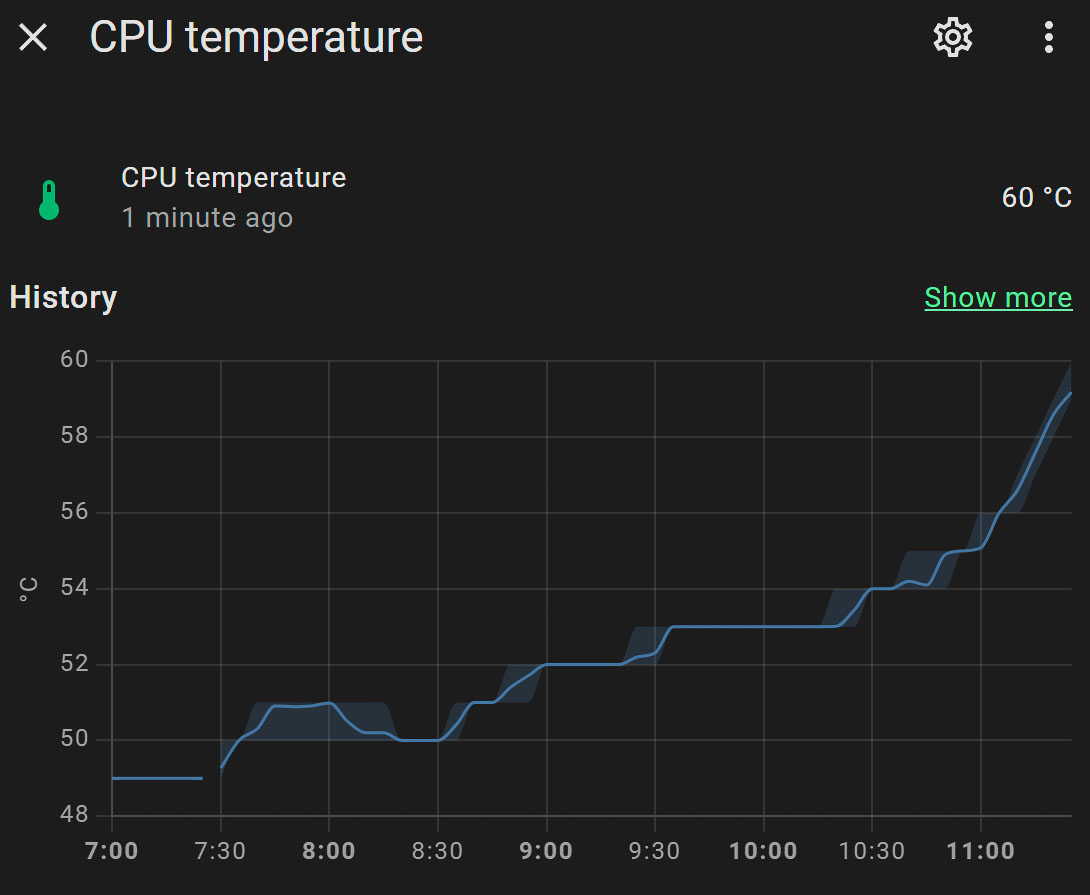
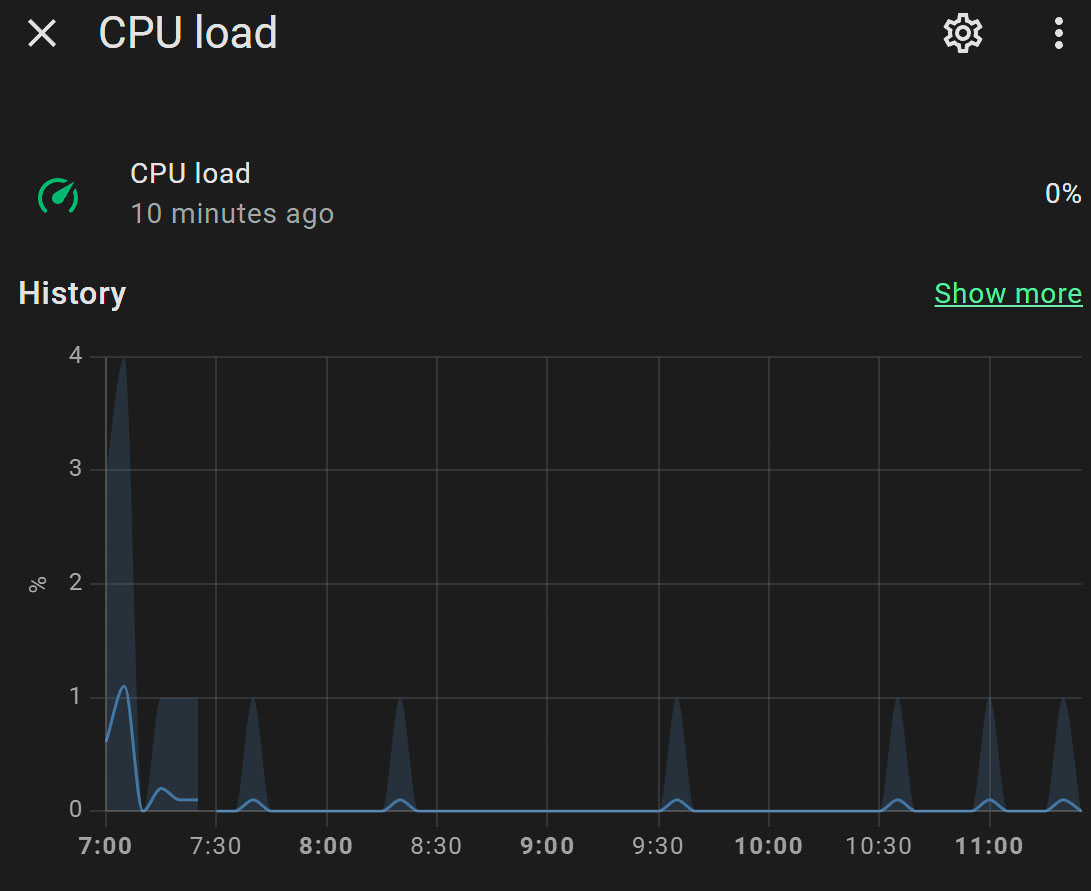
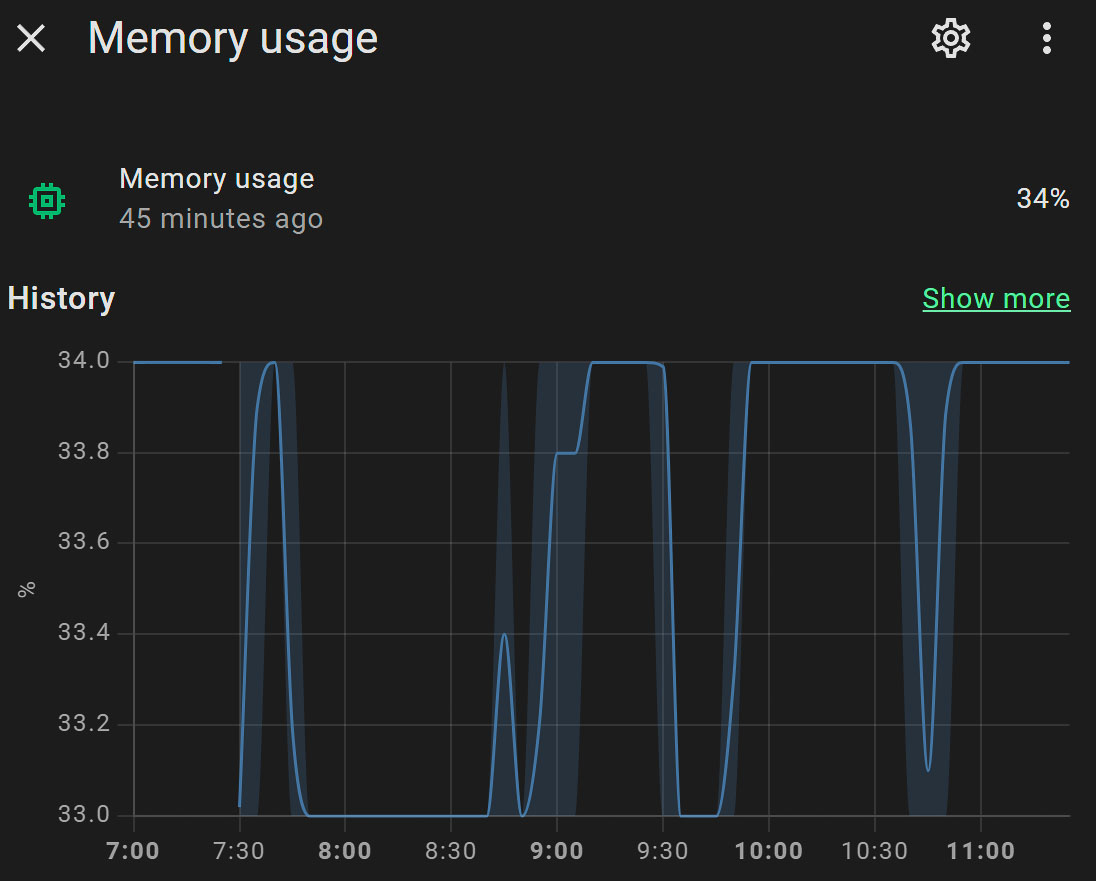
- System sensors (CPU, Memory, HDD, Temperature): Monitor your router's vitals like a tech-savvy doctor.
- SFP status and information: Stay informed about your router's Small Form-factor Pluggable transceiver.
- POE status, control, and information
- Monitor RX/TX traffic per interface: Track both incoming (RX) and outgoing (TX) data on each interface.
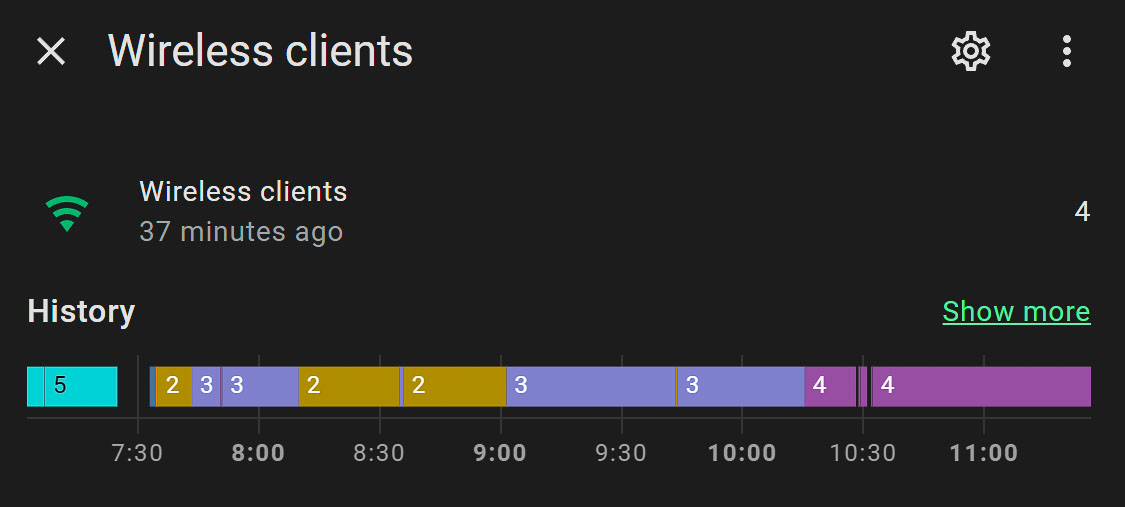
- Monitor device presence per interface: Know which devices are currently using each interface.
- IP, MAC, Link information per interface for connected devices: Get detailed information about devices connected to your network.
- Client Traffic RX/TX WAN/LAN monitoring through Accounting or Kid Control Devices (depending on RouterOS firmware version): Keep an eye on client data usage, whether it's over the wide area network (WAN) or the local area network (LAN).
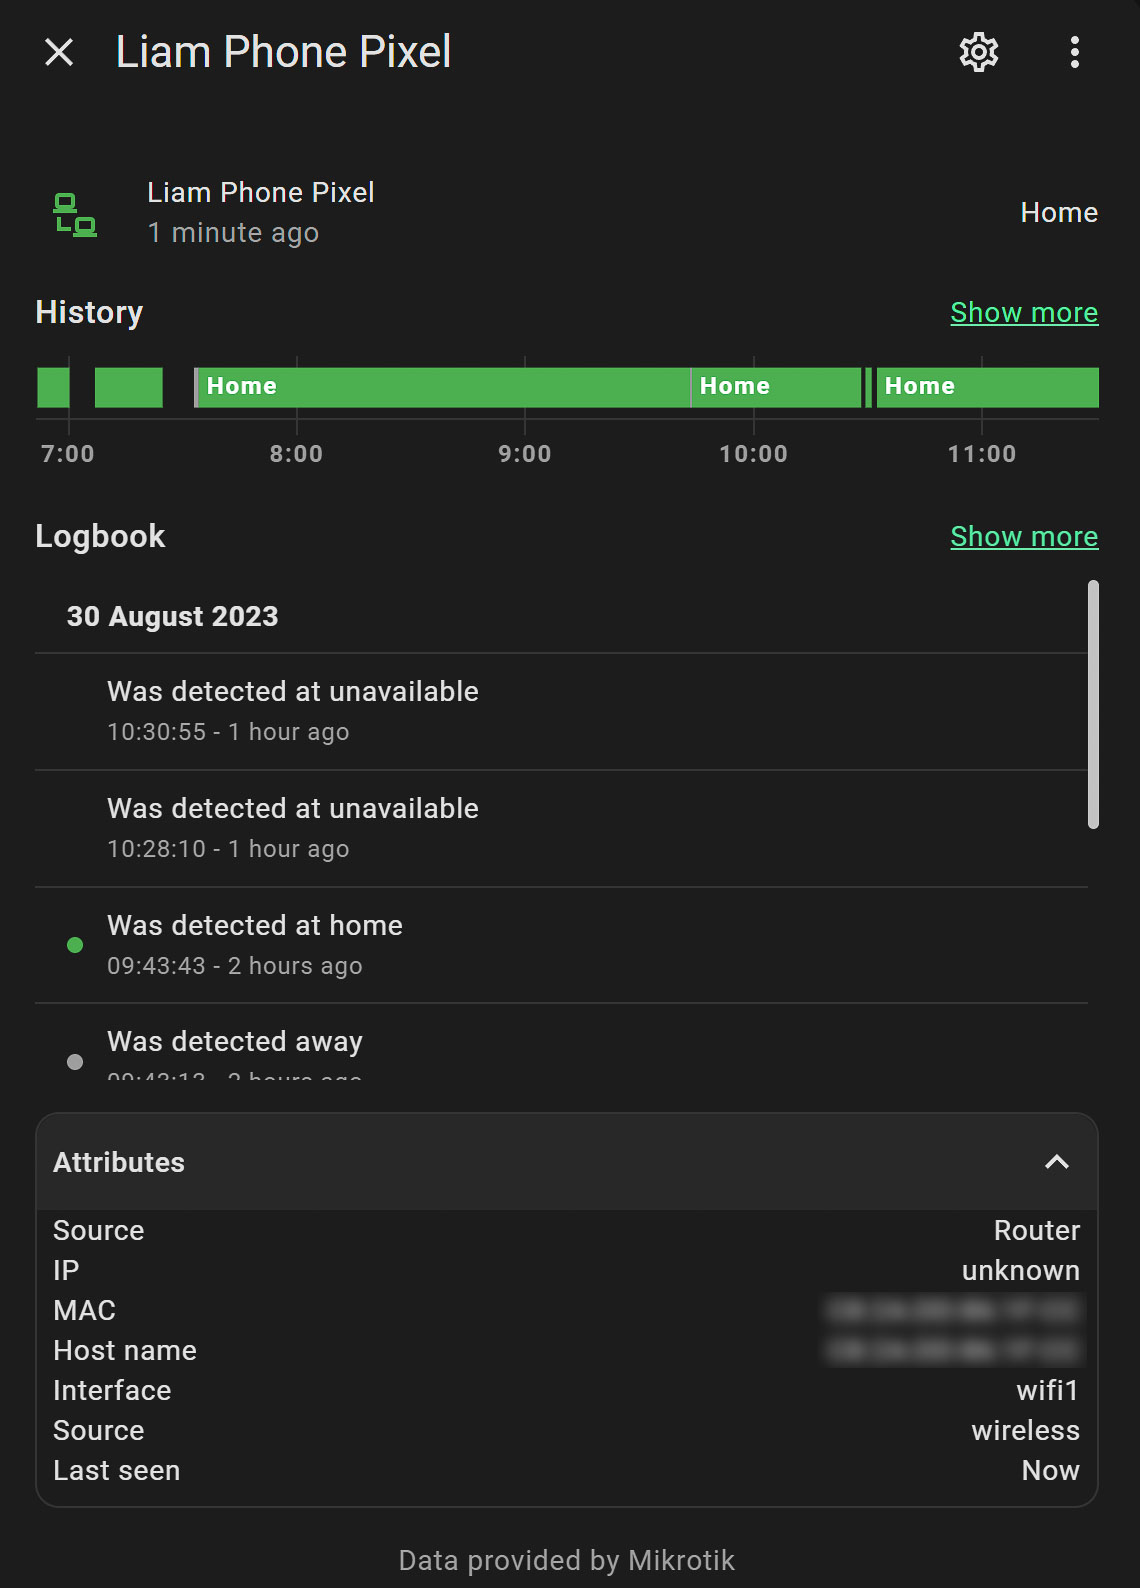
- Device tracker for hosts in network: Keep track of all devices connected to your network.
Updates
The MikroTik custom component will automatically check the firmware version for both RouterOS and the RouterBOARD, and inform you whenever there is a newer one available. You can start the update directly from the dashboard. This is the feature I, personally, make most use off, as I'm not constantly logging into my router's interface.
