
Having a smart doorbell has become something of a necessity in the age of home office we've been living in recently. If you're wearing headphones, you will want to be notified when a person is waiting on you on your phone or smartwatch. You might also want to disable the chime whenever you are on a Zoom call or the kids are in bed. While some go down the DIY route using an ESP32 to build a smart doorbell, others prefer a ready-to-use alternative.
Contents
An alternative to video doorbells
But not everyone wants to build a fully custom DIY smart doorbell, as it requires knowledge of electronics and numerous tools as a soldering iron and a 3D printer. At the same time, many don't want to buy an extra device, such as the Ring smart doorbell, that has to be mounted to the front door either in place or next to your old dumb doorbell.
If you are in that position, you might be looking for something between the two. A smart doorbell that will allow you to keep your old doorbell and chime but will notify Home Assistant whenever someone is at the door and will allow Home Assistant to disable the chime. Obviously, it also has to be easy to install.
Luckily, you are not the first person looking for such a smart doorbell. The creator of this featured project built themselves a smart doorbell, using nothing more than a Shelly 1 and a 12V DC adapter. As is the norm on this site, this smart doorbell integrates and can be controlled by Home Assistant.
What you need to make a dumb doorbell smart
As mentioned, you will only need two components for this project: a Shelly 1 and a 12V DC power supply. I'm assuming you already have some suitable wire lying around somewhere, or you might want to repurpose an old extension cable. The power supply can be found for less than $10 on Amazon, and you will also find some cheap options on AliExpress.
The Shelly 1 will be placed between the doorbell's button and the chime, and is set up to close the chime's circuit whenever the button is pushed. Because you can control everything the Shelly 1 does using Home Assistant, you can of course also have it keep the circuit open, and thus disabling the chime. This can be useful whenever you don't want to be disturbed.
Because doorbells generally use anything from 12V to 24V AC, the 12V DC power supply is a necessity. The Shelly 1 is only capable of being powered by 110-240V AC or 12V DC. Do never connect the Shelly to anything else, as it could potentially be damaged. The same power supply is also what will power the button.
What I do recommend, but isn't a necessity, are WAGO lever-nuts. These allow you to easily connect wires without having to solder anything. It also makes the removal of the Shelly 1, in case it dies, or you move, much easier.
How to set up the Shelly 1 smart doorbell
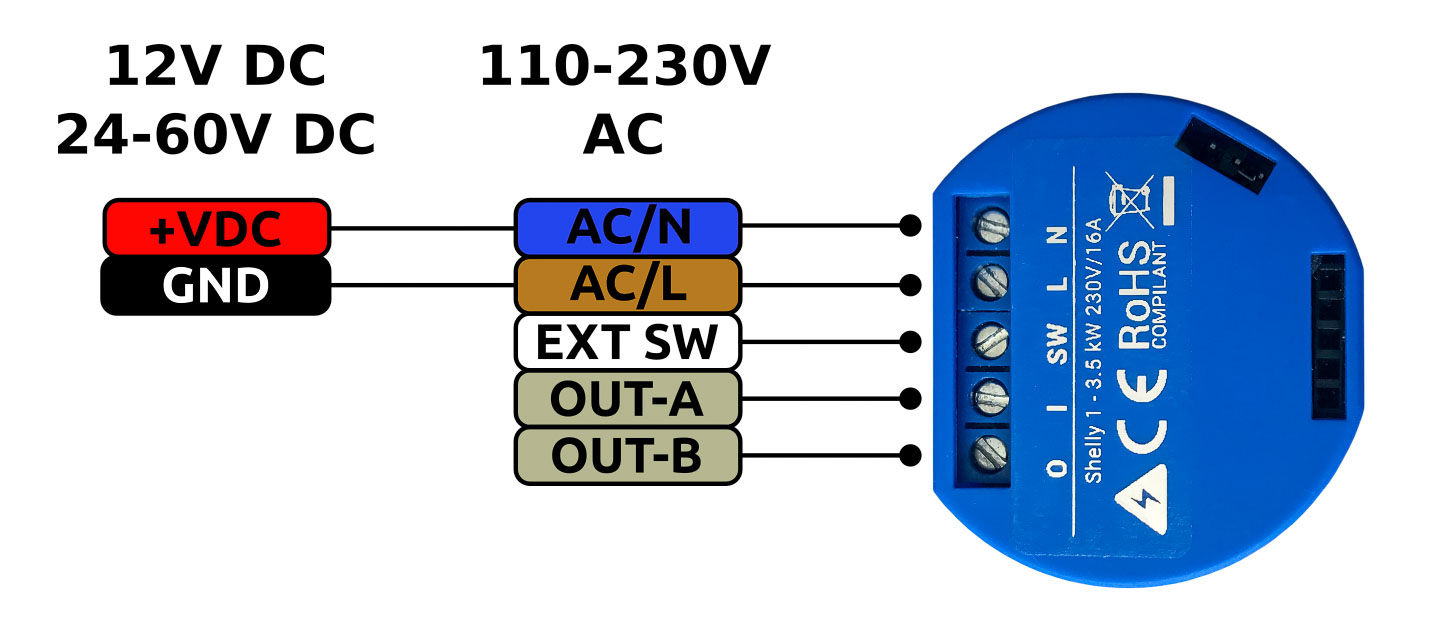
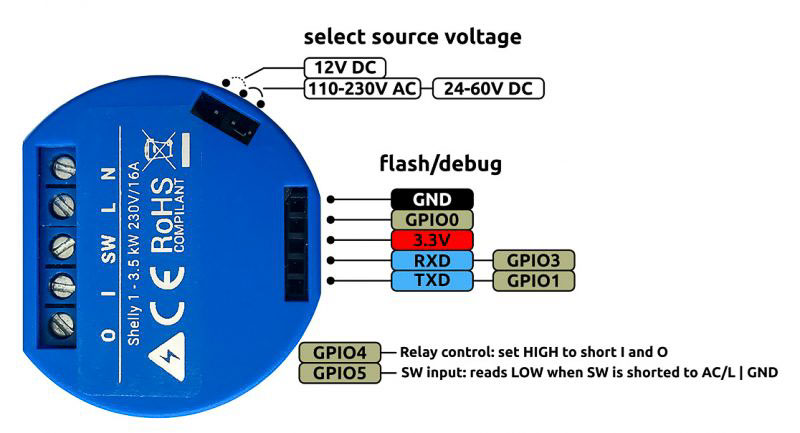
You have to make sure you set up the Shelly 1 correctly, for this smart doorbell project to work. Using the jumper located on the side, you can either have the Shelly 1 be powered using 110-230V AC or 12V DC. As mentioned previously, this project uses 12V DC. When hooking up your 12V DC adapter, the plus wire goes to the N on the Shelly 1 and the negative wire goes to the L.
The chime's transformer is connected to the terminal labelled I on the Shelly 1, then goes on to the chime itself, which in return is connected to the O on the Shelly 1. A more detailed wiring guide can be found in the Home Assistant community.
Configuring the Shelly 1 smart doorbell and Home Assistant
Once you have your smart doorbell up and running, you will need to make the following changes using the Shelly app: Set POWER ON DEFAULT MODE to Switch and set BUTTON TYPE to Toggle Switch. As a doorbell is, unlike most light switches, a push-button, the Shelly 1 has to be set up to recognize it as one.
The author of this project has confirmed that everything should work using ShellyForHass. That means that the Shelly 1 doesn't have to be modified in any way. With the Shelly integrated, you can simply create an automation when the trigger binary_sensor.shelly_doorbell_switch switches to on.
What you make out of it, is up to you. You could flash a certain light or have a push notification sent to your smartphone. It might also be useful to add a delay to the automation, as some guests might feel compelled to push the button multiple times, which would lead to multiple notifications in a short space of time.
Disabling the doorbell chime
Configuring a switch to turn the chime on and off is a bit more complicated compared to the rest of the configuration, but it should be doable even for beginners. When the chime is deactivated, any actions will still be executed (except if you place a condition to deactivate them when the chime switch is turned to off).
The code below will get the button type from the Shelly API and will set it to detached if you want the chime to be silent. All you have to do is add the IP of your Shelly 1, and you're good to go.
switch:
  - platform: rest
    name: shelly_doorbell_chime_status
    resource: http://YOUR_IP/settings/relay/0
    body_on: 'btn_type=toggle'
    body_off: 'btn_type=detached'
is_on_template: '{{ value_json.btn_type == "toggle" }}'What about the Sonoff Mini?
The Sonoff Mini is a popular alternative to the Shelly 1 and as a Sonoff device, it can, of course, be flashed with ESPHome. You can also use a Sonoff Mini to turn your dumb doorbell smart.
A community member has written about how they did it. There is one big advantage the Shelly 1 has over the Sonoff Mini. On the Shelly 1, the pins to connect the doorbell button are located on the outside and are accessible. The Sonoff Mini, on the other hand, has to be opened up to gain access to the appropriate pins.
How this project could be improved
One thing missing from this project, which the alternatives have, is a camera. You will only be informed that someone is at the door, but you won't be able to see who that someone is. One possible remedy would be to replace your peephole with a compatible camera, or use something like a battery-powered Arlo camera outside your door.
