Ever since ESPHome found a new home under Nabu Casa's roof, the open-source community held its breath anticipating the future of this beloved application. The wait is over, as the first significant shift in the way ESPHome operates was unveiled yesterday: introducing the ESP Web Tools. These innovative tools don't only elevate ESPHome's game, but promise to be a game-changer for any project harnessing the power of ESP8266 or ESP32 microcontrollers.

ESP Web Tools transform IoT landscape, benefiting ESPHome and beyond
Don't let the name and developer association mislead you; ESP Web Tools isn't playing favourites with ESPHome. Instead, these tools extend a warm invitation to anyone looking to enhance their project. Already, two popular, open-source projects, WLED and ESPEasy, have hopped on the ESP Web Tools bandwagon. As the true potential of these tools dawns on developers, we can expect to see them woven into an increasing number of projects, paving the way for a brighter IoT horizon.
A fresh take on terminology for ESP8266/ESP32 projects
In the ever-evolving world of ESPHome and other projects built on ESP8266 and ESP32 microcontrollers, accessibility is the name of the game. A new wave of simplified terminology is sweeping the scene, replacing jargon with more user-friendly language. Say goodbye to flashing firmware, and hello to installing projects. As this linguistic makeover takes root, expect to see it reflected in future articles on this website.
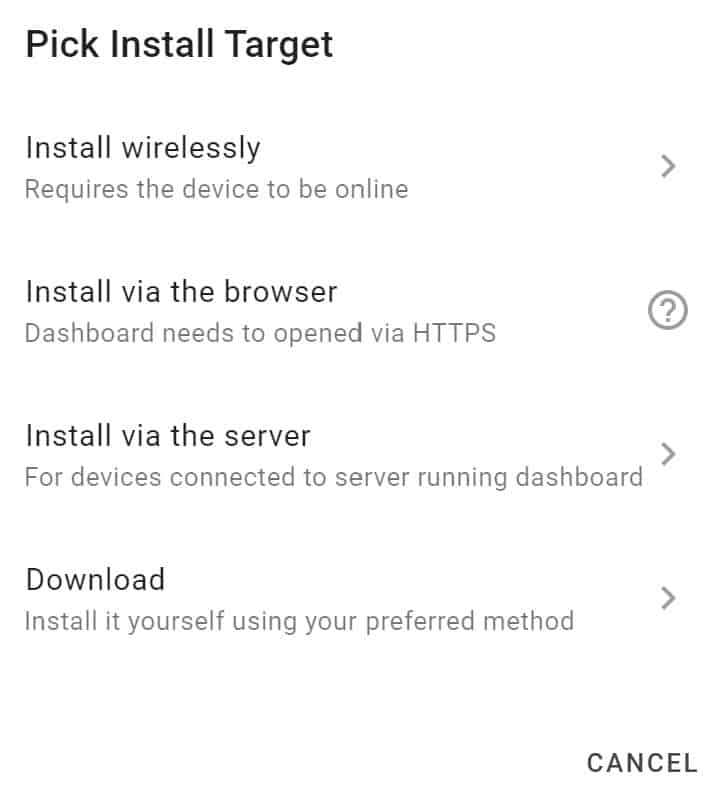
WLED and ESPEasy are already embracing the change on their installation websites, powered by ESP Web Tools. Both have adopted the more intuitive installation button. Likewise, ESPHome's dashboard has swapped its “Upload Firmware” button for an “Install” one.

ESP Web Tools need nothing more than a browser
Thanks to ESP Web Tools, DIY enthusiasts like you and me can now install projects on microcontrollers straight from a browser. That means no more downloading binaries and flashing them with ESPHome-Flasher – a welcome simplification.
At the heart of ESP Web Tools lies the Web Serial API, which connects to serial devices via a user's system serial port or through USB and Bluetooth devices that mimic a serial port. That's precisely what ESP8266 and ESP32 boards do. In plain English, the Web Serial API enables websites to interact with physical serial devices, bridging the digital and the tangible.
The not-so-perfect side of ESP Web Tools
As with any innovation, ESP Web Tools comes with its share of limitations. One hiccup is the requirement for a secure connection (HTTPS). Although this poses no issues for WLED and ESPEasy, it can create obstacles for the ESPHome dashboard. If you're accessing the dashboard via HTTP, which is likely the case for many, browser-based project installation will be off the table.
Adding to the list of caveats, the Web Serial API currently supports only Microsoft Edge and Google Chrome – both Chromium-based browsers. This may come as a blow to those striving to avoid the all-seeing eye of big tech.
During hands-on testing with WLED and ESPHome, another quirk surfaced: a noticeable decline in installation speed when the window is hidden. To circumvent this, simply open the tab in a separate window and keep it visible alongside your other tasks. It's a minor adjustment that makes a world of difference.

A hands-on look at ESP Web Tools in action
Let's walk through a real-world example of installing WLED using ESP Web Tools on a NodeMCU ESP8266, a microcontroller I often use for testing. To kick things off, I'll connect the board to my laptop with a Micro-USB cable and navigate to the WLED web installer. The installer presents a single “Install” button. Once clicked, Chrome prompts me to choose a serial port. Unsure which one to pick, I simply unplugged the NodeMCU and plugged it back in. Voilà, the right choice appeared: COM6.
In a few swift moves, the WLED project is installed on the microcontroller. No need to specify the microcontroller or board type, and no credentials to enter. The entire process clocked in at under two minutes, proving the efficiency and ease of using ESP Web Tools for IoT projects.
Initial impressions of ESP Web Tools
To say that ESP Web Tools has the potential to reshape the DIY IoT landscape for ESP8266 and ESP32 devices would hardly be an overstatement. The projects I've showcased on this site could be just a click away from seamless installation. By streamlining the process, ESP Web Tools has effectively lowered the barrier to entry for enthusiasts eager to explore the world of budget-friendly ESP8266 and ESP32 devices.


